CSS Basics. How to Apply Rounded Corners On Images #1

This tutorial will explain how to change the outside border of any image using some simple CSS rules to make it round, but this is so easy to do, that I'm finally going to make this entry for other purposes.
rounded corners, css tricks, blogger tricks, blogger design
The trick today that I'm going to publish in two parts is to help to understand at least a little of what CSS (Cascading Style Sheets) is. But very briefly that I'm not able to do a good comprehensive manual on the subject. For those who want to see a bit more, take a look at this link and for those who really want to learn thoroughly, I recommend to visit this site.

Introduction and terminology

Style sheets aim to help sort out what is the structure of a website and which is its format, its appearance. Thus, the CSS box model is essentially a box that wraps around HTML elements, and it dictates how those boxes are presented in terms of colors, fonts, width, backgrounds etc.

The advantage is that if in the future we decide to change something, we don't have to change all the pages one by one, but simply change the properties of one kind or another box from the style sheet and these changes will automatically apply in all the pages.

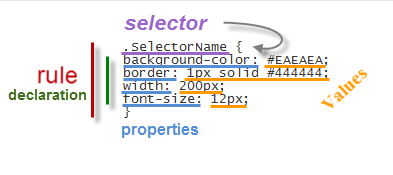
The style sheet is a set of rules, in turn composed of selectors and declarations. The selector is to be used as a nickname or name of what you want to configure from the sheet and apply to the HTML and declarations are properties that are assigned to the desired values ​​(more information on CSS syntax)

Adding the CSS selector

Once we put for example the one above in our style sheet, we see that in our website... nothing happens. I said that the selector is what relates HTML and CSS so that if we want a box to take these values ​​for width, background color, border and font size (that's what we defined earlier), we need to include the selector, thus:

<div class="SelectorName">Text here</div>

What we have added is a rule that tells the browser to interpret that this box has to be of a certain type or class. A class that was mentioned earlier is called selector having some specific properties and values ​​defined in the style sheet.

Now we'll see how this will change the look of the box, while all others that don't have the SelectorName  name will follow the standard appearance.

Therefore, when we include a rule in a style sheet, or modify an existing one, what happens is that all boxes marked with that selector will change their appearance according to the properties-values ​​that we have defined.

On the contrary, if we want that an unmarked box to change its appearance with the CSS rules defined, we'll add the appropriate selector.

Where to add the CSS style

The style can be put in a CSS file. The file is created with all the rules, you get the address and then include the following line in the header of your template. For Blogger, you can add it between <head> and <b:skin><![CDATA[/*:

<link href="syle.css" rel="stylesheet" type="text/css"/>

Note: in blue is where the address of your CSS file should be added.

You can also add the style directly mixed with HTML, inserted between the style tags:

<style>
.SelectorName {
background-color: #EAEAEA;
border: 1px solid #444444;
width: 200px;
font-size: 12px;
}
</style>

It can be inserted into a particular box, as well. In this case, you do not need to add any selector to indicate where the CSS style is:

<div style="background-color: #EAEAEA; border: 1px solid #444444; width: 200px; font-size: 12px;">Text here</div>

In Blogger the rules are between the skin tags, which means they are between <b:skin><![CDATA[/* and ]]></b:skin>. If you edit the template, will find that there are many things in between. All this is CSS that marks the appearance of your blog.

In case we want to see the effect after changing the value of some propriety, we can click on the Preview button. We can also remove anytime a declaration or add another to the desired selector.

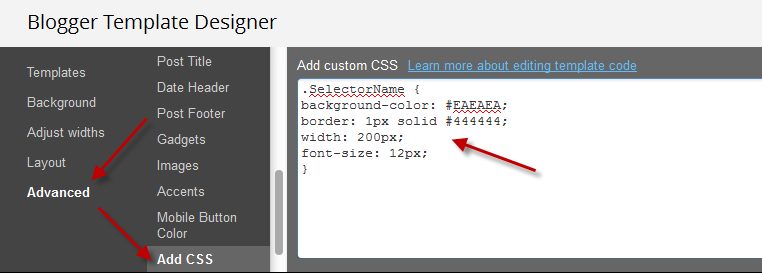
For those who don't want to touch the template, you can add the CSS directly by going to the Advanced section > Add CSS of your Template Designer.


That's enough for today. The next tutorial will discuss in more detail about how to add rounded corners to our images using CSS.
10 Places to put Adsense ads in Blogger

This article will discuss about the more common 10 places on our blog where we can place ads and about how to implement them and also which are the most suitable formats based on those available in our AdSense account.

Advertisements

In the Sidebar

adsense, ads, add adsense blogger

How to implement.

This is one of the easiest places to place AdSense. Just go to the page elements (layout), click on the "Add a Gadget" link and add an HTML/Javascript widget with your ad code inside it or add directly an AdSense widget.

Recommended formats: 125 × 125, 120 × 600 and 160 × 600

Between posts

blogger posts, blogger tricks, adsense ads

Implementation. You can implement AdSense ads between your posts: go to Layout, click on the "Edit" link below the Blog Posts section, then check the "Show Ads Between Posts" option.

Recommended formats: 468 × 60, 300 × 250 and 336 × 280

Under the header

blogger header, blogger tips, adsense

Implementation:

Firstly, convert your AdSense ad code. You can use this converter here:
AdSense Ad Converter

Then, go to your Blogger Template (from your Dashboard, click on Template and press the Edit HTML button) and search for:

<div id='header-wrapper'>

Then paste the converted code right after it.

Recommended formats: 728 × 90 and 728 × 15

Above the blog posts


make money, adsense, blogger tutorials

Implementation:

Convert your ad code and search for <div id='main-wrapper'> in your template.

Paste the converted code right after it.

Recommended formats: 460 × 68, 468 × 15 and 336 × 280

Under the title of the post (this will be visible on all the pages)

money online, blogger tricks, how to blogger
 Implementation:

Convert your AdSense ad code and then go to your Template, Expand Widget Templates and look for:

<div class='post-header-line-1'/>

Note: if you can't find it, search it without the ending slash /

Paste the converted code right after it.

Recommended formats: 468 × 68 and 468 × 15

Under the post title (visible only on the posts pages)

Implementation:

Convert your ad code and then go to your Template, Expand Widget Templates and look for:

<div class='post-header-line-1'/>

Note: if you can't find it, search it without the trailing slash /

Paste the converted code, following this example:

<b:if cond='data:blog.pageType == "item"'>

<!-- Here your ad code -->

</b:if>

Recommended formats: 468x68 and 468x15

In the posts' footer

post footer, adsense, blogger blogspot

Implementation:

Convert your ad code and then go to your Template, Expand Widget Templates and look for:

<p class='post-footer-line post-footer-line-3'/>

Note: if you can't find it, search it without the trailing slash /

Paste the converted code right after this line.

Recommended formats: 468x68 and 468x15

In the post's body (it will be visible on all pages)

adsense how to, blogger tricks, gadgets

Implementation:

Convert your ad code and then go to your Template, Expand Widget Templates and look for:
<div class='post-body entry-content'>

Note: in case you don't fint this code, search only for <div class='post-body'>

And paste the converted code, following this example:

<div style='float:right'>

<!-- Here ad code -->

</div>

Recommended formats: 125x125, 180x150, 120x240 and 200x200

In the post's body (visible only in post pages)

Convert your ad code and then go to your Template, Expand Widget Templates and look for:

<div class='post-body entry-content'>

Note: in case you don't fint this code, search only for <div class='post-body'> 

And paste the converted code, following this example:

<b:if cond='data:blog.pageType == "item"'>
<div style='float:right'>

<!-- Here your ad code -->

</div>
</b:if>

Recommended formats: 125x125, 180x150, 120x240 and 200x200

Between post and comments (visible only on posts pages)


Implementation:

Convert your ad code and then go to your Template, Expand Widget Templates and look for:

</b:includable>
<b:includable id='commentDeleteIcon' var='comment'>

Paste the converted code just above it, following this example:

<b:if cond='data:blog.pageType == "item"'>

<!-- Here comes your ad code -->

</b:if>

Recommended formats: 468x60, 300x250 and 336x280

In the blog's footer

blogger footer, adsense ads, make money online

Implementation:

Convert your ad code and then go to your Template, Expand Widget Templates and look for:

<div id='footer-wrapper'>

Paste the converted code right after it.

Recommended formats: 728x90 and 728x15

FAQ

I anticipated some questions likely to arise:

I can't find the codes, what should I do?
Always check the "Expand Widget Templates" checkbox. These are the default codes of Blogger and should be found in all the templates unless they have been changed by a hack or the template designer.

Why should I convert my AdSense code?
The Blogger's Template reads it as text and not as code and it is good to avoid any errors when trying to save it.

The ads are not displaying properly, why is that?
The ads could be affected by the styles (CSS) selectors (divs) containing them and some templates could be wrong designed, then you should consider modifying these styles, look for another relevant place or in extreme cases, change the template.

Can I put the all 10 codes on my blog?
No, you should choose just one of the places where you want to put the ads considering that AdSense have some limits on the number of ads that could be displayed. Try to make a balance with your content.

Why we there should be only 3 ads displayed on the main page?
Is due to the limit set by the AdSense. Combine the type of ads (text, rich media ads and link units) to be able to show the number of ads you want.

Hopefully, this will be useful to those of you wanting to display AdSense ads on your blog.