Showing posts with label Blogger. Show all posts

The Blogger In Draft Blog Is Being Retired


In 2007, we introduced Blogger In Draft, a special version of Blogger where new features could reach users early and let people try new things. We also introduced the Blogger In Draft blog, and for the past five years, we’ve introduced new updates and options here, often before we told the rest of the world on our official blog, Buzz.

With the recent launch of our Google+ page, we have another great way to keep you updated on new features, both for everyone and those of you who love seeing things early. To simplify the many places you can get updates, we will be retiring the Blogger in Draft blog, with this being the final post. Going forward, we’d like to invite you to follow our official blog and our Google+ page to find out what’s new with Blogger.

This doesn’t mean the Blogger In Draft service is going anywhere, so don’t fret! You’ll still get all the shiny goodness as fast as we can bring it to you. But we’ll be talking about it somewhere else.


Add Facemoods Emoticons To Your Blogger Comments

Here are some amazingly funny emoticons compatible with your Blogger comments - also with threaded commenting system! If you want to know how to add them, just follow the next steps:

emoticons, smileys, blogger, tricks

Step 1.

Go to Dashboard - Template - Edit HTML - Proceed


...and select Expand Widget Template (don't forget to make a backup)

    Step 2. Search (using CTRL + F) for this code:

    • For previous commenting system: 
    <h4 id='comment-post-message'><data:postCommentMsg/></h4>
    • For threaded comments:
    <div class='post-footer-line post-footer-line-3'>

    Step 3. Add the below code just above it

    (for threaded comments, add the code after):

    <b:if cond='data:blog.pageType == "item"'>
    <div style=' width: 450px; text-align: left; border: 1px dashed #0084ce; background: transparent; padding: 10px; color:#000000; font-weight:bold; '>
    <img border='0' src='https://blogger.googleusercontent.com/img/b/R29vZ2xl/AVvXsEg-1BfgBR5j8q9uolwkATupK44Aw1pvM7TL34qE5BvFp9gI69DCbg0Zqcc0k50OhAMCN-argSmPjCZdmBgeIaoG6gdvGGUT6l0hMwgejvy6TUZ6UC0AjBWrGAdMUoqyoDSmz8vX5t74-OLC/s1600/helplogger.blogspot.com(1).gif'/> :a
    &#160;
    <img border='0' src='https://blogger.googleusercontent.com/img/b/R29vZ2xl/AVvXsEgZBDNEsDGy5tbrG3JxUFgFR4YZ8gNz6l9QRjnZCnSUokDAa5OOYFM7fxyw_EtDI-IT5xeJ7k_PDOdamxXy5dCoi3ewUiPz71IHOfSU43ZGPvpYW82QjgvSJEajAscnFwdF_xIbEetj1NMy/s1600/helplogger.blogspot.com+(2).gif'/> :b
    &#160;
    <img border='0' src='https://blogger.googleusercontent.com/img/b/R29vZ2xl/AVvXsEhO9Z8PIAZv2HwPOaLID2_k2ARSNUrhpKq2AGdtsa1O6iEs6bCoIkCk7NVAW0Z2Hc8z3_fRodsqgCBYG5Y6zDQdCEx7JoC9cyvDpwLYvp5ltICk8GSVPYN6qaVSVMusMOgADJMTdf0cts-N/s1600/helplogger.blogspot.com(3).gif'/> :c
    &#160;
    <img border='0' src='https://blogger.googleusercontent.com/img/b/R29vZ2xl/AVvXsEi9l6fSiuVKp17Edto9YrYCfcgHUP7rLX9HIrTA-PEA7qTuDIBU4cZ1-KpsB0qRdALDMJSfICDVzVbdCn2dDg9_kcdiRRVg9k996JLTcvuTHJNdqibB0IDzLtEub0w-wAJOt_rJD1m6MrB4/s1600/helplogger.blogspot.com(4).gif'/> :d
    &#160;
    <img border='0' src='https://blogger.googleusercontent.com/img/b/R29vZ2xl/AVvXsEhA2Su7R17r1c7NIWkanqZLyBcNPesddtmDTn6NiAoJZbUh0irFhKoVFWpUo-1KKeo8Xpqmr02lf1onHq5sHmIaRi4ybrN9FwnG1FnVD2u1CvlUnR4pdsKgFiUBVUnQLZI-fSCVfHgvb-4m/s1600/helplogger.blogspot.com(5).gif'/> :e
    &#160;
    <img border='0' src='https://blogger.googleusercontent.com/img/b/R29vZ2xl/AVvXsEhABmyJthRduqYDuxC-ecN2e-8MJdUjNwFNXLxtfIvNXwdcB9UVxS3gOkDQgdot466Ou1Kspje9YLuNOo6UrpxUj-rIb5GONUjrVdUFGqJ0AtVbJjKY5KxZdA_kXdb3jcAroer6qBoYc25b/s1600/helplogger.blogspot.com(6).gif'/> :f
    &#160;
    <img border='0' src='https://blogger.googleusercontent.com/img/b/R29vZ2xl/AVvXsEjfHkcoe7Fobf_0nAr-Ho8fzPVU22qy3GXS6lHyzqJsB-Aeo6FXzrZfC2JhIuFESvo32sB09x2BlCVa0ieNGEt0XVaLSSzRstGyiLGxHU6wHQQ-wSkAHjz0aQUyV_77AHkk1yTWAxDLbt3K/s1600/helplogger.blogspot.com(7).gif'/> :g
    &#160;
    <img border='0' src='https://blogger.googleusercontent.com/img/b/R29vZ2xl/AVvXsEipZX3kTdAIGYr2sDMF6m6oOOx_PcOC_3Q8O3tIS1xAXV27CvamuSozn0cb-D-C660jZCXXL7F_ZqCpfcw27bab4_YdAxmNL_WZkmEPGF76xfGlYqITiIZ5jt7GVZQ5UYTVU7ZjNcb1hR9t/s1600/helplogger.blogspot.com(8).gif'/> :h
    &#160;
    <img border='0' src='https://blogger.googleusercontent.com/img/b/R29vZ2xl/AVvXsEiDUbC40JZ9YEkfFcoJGC97g7kXkA-hOfIMNOdsLrP3DXfh72BINptWC2rarJy0E7coOAdlkrjPxv5WyE6wOdZKIwuVO0YvLZdNQFoPJEMlsmO_Ng5GTG2qK9-JXQnVIhnpwp8SM79999zM/s1600/helplogger.blogspot.com(9).gif'/> :i
    &#160;
    <img border='0' src='https://blogger.googleusercontent.com/img/b/R29vZ2xl/AVvXsEjDT2jeArMxLYfanWO5-mz94iHwXQ-c5zB74smeMlcCFiNh-pF6cWpOOFUwkJGh3qwqW-abOaRAfZROnUiHpnmuQf39eYGxT1kKPSqHFuLo8CCuhGrWYg3NkQH8Oiei19cSPHpFB9xGQUcp/s1600/helplogger.blogspot.com(10).gif'/> :j
    &#160;
    <img border='0' src='https://blogger.googleusercontent.com/img/b/R29vZ2xl/AVvXsEjvviijLITqHjiJo8ppNVY_MOlKhlH2De-0afxDpMJoQpkEDq6gvg-F2FyRbodcyHdfALoOdtVfP2IlQM87U59NdSamha6QuuwU_iNsMQpL5iTill1qeIsGy-xwCF2A3oFKooo_Bis-NOW5/s1600/helplogger.blogspot.com(11).gif'/> :k
    &#160;
    <img border='0' src='https://blogger.googleusercontent.com/img/b/R29vZ2xl/AVvXsEiBT7P6n3PoEZk4POoroOooOTlpu9Y_gBi48O_o05pxUem6XxfcgOjaA6yNhwuetCILF5DC6qwBMdKx5tuB2WZ2Y3P_igwYwRANDmSthDU7kApJiM4PhyDbUAr4eGeA8O-Elb3RC6e8dFZr/s1600/helplogger.blogspot.com(12).gif'/> :l
    &#160;
    <img border='0' src='https://blogger.googleusercontent.com/img/b/R29vZ2xl/AVvXsEja7aQkdbpAWaanHaIyoNeJLL1E0jtMhZMbIt2POqal5org-Ah7k35Ycof9G0MSkI6Q-U8UMLOXly4aPvPF2owJwYeL88WJ3cGW5OnjcHy6noiP5p7jdHoS9OVmlspaq5C5lCRknz3SF61e/s1600/helplogger.blogspot.com(13).gif'/> :m
    &#160;
    <img border='0' src='https://blogger.googleusercontent.com/img/b/R29vZ2xl/AVvXsEgUvMfe9kCHvU-QEx8VumAuQ6V4ngfcMude-tnDskYbZIjQwycAYz9iXFrRwgyZephVTe4kk2tEtdl4X8vS3jPmVIrLsADkHghf84lSkyuTrAvkGEQcR3H-qiJbu6NQeFPumMQEZM-ZbOCO/s1600/helplogger.blogspot.com(15).gif'/> :n
    &#160;
    <img border='0' src='https://blogger.googleusercontent.com/img/b/R29vZ2xl/AVvXsEjKeym6DlmxxC1evUfwgPHIq9AvnJLHhYPfEySF_PlgYUnV7jRbmtS_Y2_7vLE2J3OdQbUYBNzD_LWwlyJNsSHofgIbjQW45I-cRfaOYUXb3DuNcikNGwPtSp45FIP-stqbGOeCkdxGuQSb/s1600/helplogger.blogspot.com(16).gif'/> :o
    &#160;
    <img border='0' src='https://blogger.googleusercontent.com/img/b/R29vZ2xl/AVvXsEiJ_7tTQXQCCXCRo3mrXEwxU8fdedlzEz0f1WCOBPFm_wmaIOAjQWQ38zeSvErTvWnWCa2ZFa_EkrI1cmNnTdvJgL3SgqrhKKs6Ic4LG2Ug3Ce8dLdLx9Wxl3zPVZQSMsNr9_5raglX0xU_/s1600/helplogger.blogspot.com(14).gif'/> :p
    &#160;
    <img border='0' src='https://blogger.googleusercontent.com/img/b/R29vZ2xl/AVvXsEgKEFb7g9gZJ84NBolBxJDRVPPfv_mCY1hlsK7U-EOKINRtOtFx7-JvqqgG6AXUKqY9Dvu430m-cyuVh7EcbAMmmcvcwI0ftDFKF8UivW5Au4cpVloA64sy1-D7vDiS76giAYZaC6grj2rj/s1600/helplogger.blogspot.com(17).gif'/> :q
    &#160;
    <img border='0' src='https://blogger.googleusercontent.com/img/b/R29vZ2xl/AVvXsEh4bww5oGU8z_M839HCSoQ1xsJHtTdQ6r54xAEfSW33aqxPJERZ5DF9HPhzZYicmNS-skVhPcZKrMqX2z1VZLwY7ZCoJU-ClJDmPUAg611QuT2Uefcxj_Vv1ZrqeQdkoPuVRzHJuPMHzoRk/s1600/helplogger.blogspot.com(18).gif'/> :r
    &#160;
    <img border='0' src='https://blogger.googleusercontent.com/img/b/R29vZ2xl/AVvXsEiixg1zzuoV_gIsUu4_pyBIk1gvMPIvcNaTS8KX-Eq4mH4PIQkhCrmOt87z4IkMcXMWdtYEOOjV0bk9LjC_uuOx8tDIhC-_ZXiR9SjFHXQcM_lwFFBpN8r3DRSt37nLwjdV6Erw5h4dmOxp/s1600/helplogger.blogspot.com(19).gif'/> :s
    &#160;
    <img border='0' src='https://blogger.googleusercontent.com/img/b/R29vZ2xl/AVvXsEiEc1e-nm3vMEOXrkq97w8423nNePuPA6m6mLxhjvL7GFOoIfqTg0tX3QQaQwBQhp29QE5A-fb_3XNmsteQF4o6y-HOWLfqEfdQmZQ7k-B1D_cSXj0cOAjvqHAwtPROqqoQkGy2SzGQuTaN/s1600/helplogger.blogspot.com(20).gif'/> :t   <a href='http://helplogger.blogspot.com/2012/05/add-facemoods-emoticons-to-your-blogger.html' style='color: rgb(30, 122, 183); font-size: x-small;'>Add smileys to Blogger + </a>
    </div></b:if>

    Step 4. Now search for this piece of code:

    </body>

    Step 5. And add the following code immediately above it:

    • For previous commenting system:
    <script type='text/javascript' src="http://helplogger.googlecode.com/svn/trunk/facemood emoticons.js"/>
    • For threaded comments: 
    <script type='text/javascript' src="http://helplogger.googlecode.com/svn/trunk/facemood emoticons threaded.js"/>

    Step 6. Save the Template. Now, enjoy your comments!

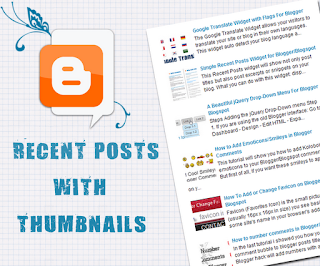
    Recent Posts Widget with Thumbnails for Blogger/Blogspot

    A few days ago, I've posted a tutorial about How To Add A Simple Recent Posts Widget but today I want to present to you a very nice Recent Posts widget that comes along with posts thumbnails and post summary as well. If you want to know how to add this Recent Posts widget/gadget to your Blogger blog, then follow the steps below:

    recent posts, blogger widgets

    How to Add the Recent Posts Widget to Blogger

    Step 1. Go To Blogger > Layout and click on "Add a Gadget" link


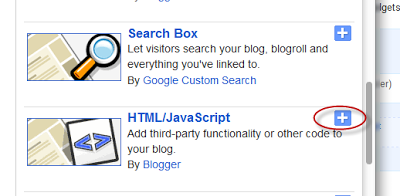
    Step 2. From the pop-up window, scroll down and choose HTML/JavaScript


    Step 3. Paste inside the empty box, the following code:

    <div class="eggTray">
    <script src="http://helplogger.googlecode.com/svn/trunk/listbadge.js">{"pipe_id":"1a6640e2a78b2c6e736f2220529daae5","_btype":"list",
    "pipe_params":{"URL":"YOUR-BLOG/SITE-URL/feeds/posts/default"},
    "hideHeader":"false","height":"500","count": 8 }</script>
    <div style="font-family: arial, sans-serif; font-size: 9px;" class="ycdr"><a href="http://helplogger.blogspot.com/2012/05/recent-posts-widget-with-thumbnails-for.html" target="_blank" title="Grab this widget">Recent Posts Thumbnails</a> <a href="http://helplogger.blogspot.com/" target="_blank">Blogger Widget</a></div><noscript>Your browser does not support JavaScript!</noscript></div>
    <style type=text/css>
    .eggTray {margin:10px 0px;padding:0px;}
    .ybr li  {border-bottom:0px #cccccc dotted; padding:0px 0px 10px 0px!important;}
    .pipesTitle {padding-top:0px;}
    .pipesDescription {display:true;}
    .ycdr {background:transparent url(https://blogger.googleusercontent.com/img/b/R29vZ2xl/AVvXsEjTcEP4CEVkjKQs7_VtYWMIOZSifYUZkrqR6asSvNX7EfkgTTsAXThwYD7dobcr17rB2UOR5PNSYkOzKjUQT3dZH8iVYed5slGqS0cpi2Oy8N1vkZ-9k6XGqu_LvujhwnJDazsrPUeajks/s1600/logo.png) 0px 0px no-repeat; padding: 1px 0px 0px 19px; height:14px; margin: 4px 0px 0px 0px;line-height:14px;}
    .ycdr, .ycdr a {color:#999999;}
    .widget .popular-posts ul {padding-left:0;}
    </style>

    Step 4. Change YOUR-BLOG/SITE-URL with the url address of your site/blog (ex: http://helplogger.blogspot.com) and look to have no forward slash symbol "/" at the end of your url

    Note:
    • To disable the scroll bar, remove the number 500
    • By default, this widget is set to display a maximum of 8 recent posts. To change this number, replace the number 8 with the number of posts desired
    • if you want only the posts titles to appear, change true to none and "0" from padding-top:0px with 10

    Step 5. Save your widget. And you're done!

    If you need more help, leave your comment below.

    Google Translate Widget with Flags For Blogger

    The Google Translate Widget for Blogger allows the visitors to translate your site or blog in their own language.
    This widget also auto-detect your blog language and then translate it to the readers chosen language.

    It supports 12 different languages:
    English, French, German, Spanish, Italian, Dutch, Portuguese, Russian, Japanese, Korean, Arabic And Chinese.
    google translate for blogger, blogger gadgets, blogger tricks

    How To Add The Google Translate Widget To Blogger

    Step 1. Go to your Blogger Dashboard >> Layout and click on "Add A Gadget" link


    Step 2. From the pop-up window, scroll down and choose HTML/JavaScript


     Step 3. Paste the code below in the empty box:

    <script type="text/javascript">
    function showHide(shID) {
        if (document.getElementById(shID)) {
            if (document.getElementById(shID+'-show').style.display != 'none') {
                document.getElementById(shID+'-show').style.display = 'none';
                document.getElementById(shID).style.display = 'block';
            }
            else {
                document.getElementById(shID+'-show').style.display = 'inline';
                document.getElementById(shID).style.display = 'none';
            }
        }
    }
    </script>

    <style>

     .google_translate img {
    margin: 10px 20px 0px 20px;
        height: 24px;
        width: 24px;
            }
            .google_translate:hover img {
    filter:alpha(opacity=0.30);
            -moz-opacity: 0.30;
            opacity: 0.30;
            border:0;
            }

    .more {
        display: none;
    a.showLink, a.hideLink {
        text-decoration: none;
        color: #0880C4;
        padding-left: 18px;
        background: transparent('down.gif') no-repeat left; }

    a.hideLink {
        background: transparent url('up.gif') no-repeat left;
    color: #0880C4;}

    a.showLink:hover, a.hideLink:hover {
    color: #0880C4;
     }

     </style>

     <div>

     <a class="google_translate" href="#" target="_blank" rel="nofollow" title="English" onclick="window.open('http://translate.google.com/translate?u='+encodeURIComponent(location.href)+'&langpair=auto%7cen&hl=en'); return false;"><img alt="English" border="0" align="absbottom" title="English" height="24" src="https://blogger.googleusercontent.com/img/b/R29vZ2xl/AVvXsEhRVPG-4-V155lsDs86oBfx87RopnmSTRGDAiIy_t-xb6n6GSasZD_Q2V5lIoi34PVg99swDvTWcEJ6YeMECKFD3SnDRCJjWJ9SQmrvpQrG9Kt65yojIgzqVVBrC5E76nScIU5M67dDTFQS/s1600/United+Kingdom(Great+Britain).png" style="cursor: pointer;margin-right:8px" width="24"/></a>

     <a class="google_translate" href="#" target="_blank" rel="nofollow" title="French" onclick="window.open('http://translate.google.com/translate?u='+encodeURIComponent(location.href)+'&langpair=auto%7cfr&hl=en'); return false;"><img alt="French" border="0" align="absbottom" title="French" height="24" src="https://blogger.googleusercontent.com/img/b/R29vZ2xl/AVvXsEhPF0dXm70Q9ASkd-0uFbpSMVykUifNOasSAnFRBzuSoELjoJ5y_JQBfG2NuvaR_zdV0L5ukc112kaUcekDe9ORIrSMdqxqYa9_TyxydhskBLjl-7OedG8HxkhAJWiBEhEFmf3UYOiwnEGU/s1600/France.png" style="cursor: pointer;margin-right:8px" width="24"/></a>

     <a class="google_translate" href="#" target="_blank" rel="nofollow" title="German" onclick="window.open('http://translate.google.com/translate?u='+encodeURIComponent(location.href)+'&langpair=auto%7cde&hl=en'); return false;"><img alt="German" border="0" align="absbottom" title="German" height="24" src="https://blogger.googleusercontent.com/img/b/R29vZ2xl/AVvXsEgu_rxfk6rmmDZN1JQSPHrzYMxaOfW2JK_b_qtgIDn8co2tucVSyE4DnP755JWvlhcxQvZ4Piz4IpGThK_qj-NKEdLUwXP1suBrxCbvA8A9WeilPaBmBilb_IdkyXnOF6vIpSRyOCfbPIEp/s1600/Germany.png" style="cursor: pointer;margin-right:8px" width="24"/></a>

     <a class="google_translate" href="#" target="_blank" rel="nofollow" title="Spain" onclick="window.open('http://translate.google.com/translate?u='+encodeURIComponent(location.href)+'&langpair=auto%7ces&hl=en'); return false;"><img alt="Spain" border="0" align="absbottom" title="Spain" height="24" src="https://blogger.googleusercontent.com/img/b/R29vZ2xl/AVvXsEi9uRikDba9ruCQYgmTLGC4OIwU7qpx5uY0fe8V33jQ4RyHlPZzGHDnK2Z85FjmPoKgArKfc7XwotOJWbiaSzu0VjMEJPRg5eyxn-WTI1VweshjHCAlXupje9N7eCU2A965TdEI6CszYB1Y/s1600/Spain.png" style="cursor: pointer;margin-right:8px" width="24"/></a><a href="#" id="example-show" class="showLink"
    onclick="showHide('example');return false;">More</a>
    <div id="example" class="more">
     <a class="google_translate" href="#" target="_blank" rel="nofollow" title="Italian" onclick="window.open('http://translate.google.com/translate?u='+encodeURIComponent(location.href)+'&langpair=auto%7cit&hl=en'); return false;"><img alt="Italian" border="0" align="absbottom" title="Italian" height="24" src="https://blogger.googleusercontent.com/img/b/R29vZ2xl/AVvXsEiXoMoY1xfk9ePdqmtlUyuEt56MYj8L8zC5BGu_LsnjjBDLVH02gp12mhya07ecgHJKDX1YgQbyVHuYxQacauFSqsLzXririKyu4aFfy_Zdb6REKI2szhjnGVGob2PgiTPPlj3y3t1rcN8R/s1600/Italy.png" style="cursor: pointer;margin-right:8px" width="24"/></a>

     <a class="google_translate" href="#" target="_blank" rel="nofollow" title="Dutch" onclick="window.open('http://translate.google.com/translate?u='+encodeURIComponent(location.href)+'&langpair=auto%7cnl&hl=en'); return false;"><img alt="Dutch" border="0" align="absbottom" title="Dutch" height="24" src="https://blogger.googleusercontent.com/img/b/R29vZ2xl/AVvXsEj4_56uQUHiN8c4CB_ZkhImTBJJGuzKidTNQonJtN-yydrIt4yn4VdAhyvQ6zNxdUODgkUdng7QRMiVgGi-_L1upqC70UfZ14Uvjr7DlG6vIM_FVYFxjEimT8uke-pK8kSDZYERKElDtYUS/s1600/Netherlands.png" style="cursor: pointer;margin-right:8px" width="24"/></a>
          <a class="google_translate" href="#" target="_blank" rel="nofollow" title="Russian" onclick="window.open('http://translate.google.com/translate?u='+encodeURIComponent(location.href)+'&langpair=auto%7cru&hl=en'); return false;"><img alt="Russian" border="0" align="absbottom" title="Russian" height="24" src="https://blogger.googleusercontent.com/img/b/R29vZ2xl/AVvXsEjceK5pKlv5fTWJOWNJK3UGa45Sw_RJ7aCTP8j6EURpaj34WwR0Ucjbh9M1r42gEYuUNT8XZ8oLJftJkxMwaWEXXflR8iJM98JN29uIy6Kto3_-3muMDqJ2K1GfBoZ8G25YzH3PoNKjckli/s1600/Russian+Federation.png" style="cursor: pointer;margin-right:8px" width="24"/></a>

     <a class="google_translate" href="#" target="_blank" rel="nofollow" title="Portuguese" onclick="window.open('http://translate.google.com/translate?u='+encodeURIComponent(location.href)+'&langpair=auto%7cpt&hl=en'); return false;"><img alt="Portuguese" border="0" align="absbottom" title="Portuguese" height="24" src="https://blogger.googleusercontent.com/img/b/R29vZ2xl/AVvXsEgk2EX0ZLWELp5cqRyJxa00XipvMkTKUQtRt7FyX6p6ziCrAA19fzWso4OpgGeMIEc3X816Zk45Mfk8Ide-XHAaaTrGfskQ79gR_O0GgPM6Jq510rwo9jaLWozXZczhUCsB7li4FDoE5MpF/s1600/Brazil.png" style="cursor: pointer;margin-right:8px" width="24"/></a>
    <br />
     <a class="google_translate" href="#" target="_blank" rel="nofollow" title="Japanese" onclick="window.open('http://translate.google.com/translate?u='+encodeURIComponent(location.href)+'&langpair=auto%7cja&hl=en'); return false;"><img alt="Japanese" border="0" align="absbottom" title="Japanese" height="24" src="https://blogger.googleusercontent.com/img/b/R29vZ2xl/AVvXsEiAB31rUwtsVbCsPQlANL_7mnFf8bBkh8x-4ZjEn_Tv7geVX8pVlA9sTa_VTFwwAbVWEqGCitnfd8wpyaL93I774GWj5D5TVf8-GKXEWHrIwPBmqA_SP-xxugfTqq3wib4eH7NOlvr5m3xc/s1600/Japan.png" style="cursor: pointer;margin-right:8px" width="24"/></a>

     <a class="google_translate" href="#" target="_blank" rel="nofollow" title="Korean" onclick="window.open('http://translate.google.com/translate?u='+encodeURIComponent(location.href)+'&langpair=auto%7cko&hl=en'); return false;"><img alt="Korean" border="0" align="absbottom" title="Korean" height="24" src="https://blogger.googleusercontent.com/img/b/R29vZ2xl/AVvXsEjIfWXsOY4gMtv3MUT53K8oF0p1cJiM2CdSkQlU5ZJFCAv-BxQbOjW_fxuRn3OY98cPL_evAcnj2-hyhSKvy1jG10P5a1vJJueY6BFVy_Ktv4M81EnEsqAyoBkifJMFI0zPZeBvCZwaSpBM/s1600/South+Korea.png" style="cursor: pointer;margin-right:8px" width="24"/></a>

     <a class="google_translate" href="#" target="_blank" rel="nofollow" title="Arabic" onclick="window.open('http://translate.google.com/translate?u='+encodeURIComponent(location.href)+'&langpair=auto%7car&hl=en'); return false;"><img alt="Arabic" border="0" align="absbottom" title="Arabic" height="24" src="https://blogger.googleusercontent.com/img/b/R29vZ2xl/AVvXsEhbSz-QK5KZF3z9vqCCv-KdQR7Xl67jmjEylKF2wmkqHRHGtvk9FnP7rIV6Bz6JXExGFo31xlIMkf83hxZkNMRAjqzERrM6RT1fxqx3iln8a5-5-iH2Q3FF54ZLweeRvazuSN_HbbHnxuPy/s1600/Saudi+Arabia.png" style="cursor: pointer;margin-right:8px" width="24"/></a>

     <a class="google_translate" href="#" target="_blank" rel="nofollow" title="Chinese Simplified" onclick="window.open('http://translate.google.com/translate?u='+encodeURIComponent(location.href)+'&langpair=auto%7czh-cn&hl=en'); return false;"><img alt="Chinese Simplified" border="0" align="absbottom" title="Chinese Simplified" height="24" src="https://blogger.googleusercontent.com/img/b/R29vZ2xl/AVvXsEgew4FD1BwDvCQahqfcZ425g4L8DNrL12iVTAokhWGJ-xgDWqhbONBLAxzut3Kyi6793s_wE98yullPO8hvhLVNlphyFIEYf6NDjKaInWOmIKYoQujz6EkOz-6qxIbEVoq15sWqMk14uhlh/s1600/China.png" style="cursor: pointer;margin-right:8px" width="24"/></a>
        <p><a href="#" id="example-hide" class="hideLink"
        onclick="showHide('example');return false;">Hide / </a><a href="http://helplogger.blogspot.com"><font size="1px">Get this widget</font></a></p>
    </div>
         </div>

    Step 4. Now click on Save

    google translate, blogger widgets, gadgets for blogspot
    And you're done! Enjoy (:

    A Beautiful jQuery Drop-Down Menu For Blogger Blogspot

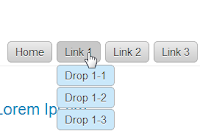
    Alright, this time, we are going to make a stylish and simple jQuery drop down menu. The main objective is to make it as simple as possible, with some little jQuery effect and easy to customize/ apply different style on it. To style it into your own design, you just have to modify the a tag CSS style. You can change colors or put background images, or the size and color of text.
    jquery menu, menu blogger

    Steps Adding the jQuery Drop-Down menu

    Step 1. Go to Dashboard - Template - Edit HTML - Proceed


    Step 2. Expand Widget Template (make a backup)
      jquery drop-dowm menu


      Step 3. Search for the following code:

      ]]></b:skin>

      Step 4. Add the following CSS code before/above it:

      #jsddm {
      height: 40px;
      margin: 0;
      overflow: visible;
      z-index: 2;
      padding: 15px;
      position:relative;
      }
      #jsddm li {
      float: left;
      list-style: none;
      font: 12px Tahoma, Arial;
      }
      #jsddm li a {
      display: block;
      white-space: nowrap;
      margin:1px 3px;
      border: 1px solid #AAAAAA;
      background: #cccccc;
      background: -webkit-gradient(linear, left top, left bottom, from(#ebebeb), to(#cccccc));
      background: -moz-linear-gradient(top, #ebebeb, #cccccc);
      padding: 5px 10px;
      -webkit-border-radius: 5px;
      -moz-border-radius: 5px;
      border-radius: 5px;
      text-shadow: #ffffff 0 1px 0;
      color: #363636;
      font-size: 15px;
      font-family: Helvetica, Arial, Sans-Serif;
      text-decoration: none;
      vertical-align: middle;
      }
      #jsddm li a:hover {
      background: #C8C8C8;
      }
      #jsddm li ul {
      margin: 0;
      padding: 0;
      position: absolute;
      visibility: hidden;
      border-top: 1px solid white;
      }
      #jsddm li ul li {
      float: none;
      display: inline;
      }
      #jsddm li ul li a {
      width: auto;
      background: #CAE8FA;
      }
      #jsddm li ul li a:hover {
      background: #A3CEE5;
      }

      Step 5. Now find this piece of code:

      </head>

      Step 6. Add this code immediately before/ABOVE it:

      <script src='http://ajax.googleapis.com/ajax/libs/jquery/1.2.6/jquery.js' type='text/javascript'/>
        <script type='text/javascript'>
        //<![CDATA[
      var timeout    = 500;
        var closetimer = 0;
        var ddmenuitem = 0;
      function jsddm_open()
        {  jsddm_canceltimer();
        jsddm_close();
        ddmenuitem = $(this).find('ul').css('visibility', 'visible');}
      function jsddm_close()
        {  if(ddmenuitem) ddmenuitem.css('visibility', 'hidden');}
      function jsddm_timer()
        {  closetimer = window.setTimeout(jsddm_close, timeout);}
      function jsddm_canceltimer()
        {  if(closetimer)
        {  window.clearTimeout(closetimer);
        closetimer = null;}}
      $(document).ready(function()
        {  $('#jsddm > li').bind('mouseover', jsddm_open)
        $('#jsddm > li').bind('mouseout',  jsddm_timer)});
      document.onclick = jsddm_close;
        //]]>
        </script>

      Step 7. Click on Save Template button.

      Step 8. Go to Layout > click on "Add a gadget" link


      Step 9. Choose HTML/JavaScript from the pop-up window


      Step 10. Paste the following code in the empty box:

      <ul id="jsddm">
        <li><a href="#">Home</a>
        <li><a href="#">Link 1</a>
        <ul>
        <li><a href="#">Drop 1-1</a></li>
        <li><a href="#">Drop 1-2</a></li>
        <li><a href="#">Drop 1-3</a></li>
        </ul>
        </li>
       <li><a href="#">Link 2</a>
        <ul>
        <li><a href="#">Drop 2-1</a></li>
        <li><a href="#">Drop 2-2</a></li>
        </ul>
        </li>
       <li><a href="#">Link 3</a>
        <ul>
        <li><a href="#">Drop 3-1</a></li>
        <li><a href="#">Drop 3-2</a></li>
        <li><a href="#">Drop 3-3</a></li>
        <li><a href="#">Drop 3-4</a></li>
        </ul>
        </li>
       <li><a href="#">Link 4</a></li>
        <li><a href="#">Link 5</a></li>
        <li><a href="#">Link 6</a></li>
        </li></ul>

      Note :

      You must change links titles and replace the # symbol with the URL address of each of your links

      Step 11. Click on Save

      Important:

      - if your menu is on the sidebar, or footer, just drag it to your page header and click and click Save again.
      - if drop down links are not showing, do the following:

      Go back to Template > Edit HTML and search (CTRL + F) for this code:

      <b:section class='header' id='header' maxwidgets='1' showaddelement='no'>

      You should change 1 with 3 and no with yes like this:

      <b:section class='header' id='header' maxwidgets='3' showaddelement='yes'>

      Save the Template.

      Next thing to do is to go to Layout and drag your menu immediately below your header


      Then click on Save Arrangement


      Here you can see the DEMO.

      Enjoy! :)


      How to Add A Comment Count Bubble To Blogger Post Titles

      A comment bubble with current number of comments displayed to each blogger post titles could make your blog more attractive. This improves not only your comments count but also allows your visitors to see what are the most popular posts on your blog. When a post has many comments, then the comment bubble will show the popularity of your posts to readers and visitors so that they might be more interested in reading them.

      So let's start adding it:


      Step 1. Go to Dashboard - Template - Edit HTML (click on Proceed button, if needed)


      Step 2. Select "Expand Widget Template" (make a backup)

        Step 3. Find - using CTRL + F - the following piece of code in your template:

        ]]></b:skin>

        Step 4. Add the below code just above ]]></b:skin>:

        .comment-bubble {
        float : right;
        width : 48px;
        height : 48px;
        background : url(https://blogger.googleusercontent.com/img/b/R29vZ2xl/AVvXsEgrT_4-DnCmadg19bqWLW8JXkjNbQZ97RzrdUGPFmOdabw6RL1AzyUKhabBlQ333tf2skCCUH2rSLLsjqTwttKegqQ62grEF7I21sspstxlVedMmPSWf9u8lyNaemz6OH9Sg9nDF58k7xfk/s1600/speech+bubble+green.png);
        background-repeat: no-repeat;
        font-size : 18px;
        margin-top : -15px;
        margin-right : 2px;
        text-align : center;
        }

        Step 5. Now find this code:

        <b:if cond='data:post.title'>
        <h3 class='post-title entry-title'>

        Note: If you can't find it, search this code instead:

        <b:if cond='data:post.title'>
              <h3 class='post-title entry-title' itemprop='name'>

        Step 6. And add this code immediately after it:

        <b:if cond='data:post.allowComments'>
        <a class='comment-bubble' expr:href='data:post.addCommentUrl' expr:onclick='data:post.addCommentOnclick' style='color: #ffffff; font-size: 18px; font-weight: bold;'><data:post.numComments/></a>
        </b:if>

        Note:
        • to change the color of the comments number, replace #ffffff with the hex value of your color;
        • to change the font size, increase/decrease the 18px value;

        Step 7. Preview your template and if everything is ok, click on Save Template.

        Comment Bubbles 

        You can choose one of the images below - right click on the desired image and select "Copy Image Address/Location", then replace the red code from step 3 with the address you just copied.

        bubble comment count, bubble blogger postsblogger comments, comment countblogger blogspot, blogger commentsblogger bubble comment countcomments in blogger titlesblogger tips, blogger tricksblogger widgets, bubble comment countbubble comment countBubble Comment CountBubble Comment Count, blogger blogspot


        That's it! Enjoy (:

        You might also be interested in reading this tutorial:

        How to Create Static Pages in Blogger

        What are Blogger static pages? 

        Blogger Static Pages allows you to create specific pages like About Me, Contact page, Privacy Policy etc. on stand-alone pages that are linked from your blog. The static pages basically are the same as post pages, but there are several things that make them different. One of the differences is that static pages don't appear in the home page, don't have a label, and are not indexed as archive pages.


        How to Create Static Pages in Blogger.

        Step 1. Log in to your Blogger Dashboard

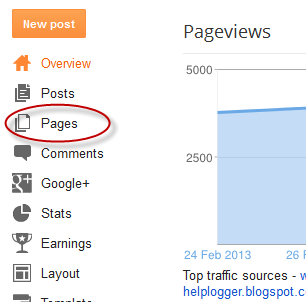
        Step 2. Click on Pages
        static pages blogger, blogger tutorials, widgets


        Step 3. Click on New Page - Blank Page

        Step 4. Type the title and write the page's content.


        Step 5. Before publishing it, click on Preview to see how it will appear on your blog.

        Step 6. When you have finished the editing, click on Publish button.

        Step 7. Now you have 3 options:
        1. Keep it as nav menu below header - Top tabs
        2. Display the page in your blog's sidebar - Side Links
        3. Add the page's link manually to your template - Don't Show

        Step 8. After you have chosen where the page will appear, click on the Save arrangement button


        And now you're done!
        Now you have owned the static page. If you want another static page, just repeat the steps above.

        Note: if you have opted for Don't show option: go to Pages again and right click on the page's title and select Copy link location (in firefox). You can add the link manually to your sidebar via Link widget or add the link in your template, via Edit HTML.

        If you need more help, leave a comment below.

        Ways To Increase Page Impressions and Traffic on Your Blog

        What is a Google AdSense "Page Impression"?

        The page impressions or page views - how much time a user stays on your website and how many pages are visited. This is one of the most important things when talking about advertising. Page impressions are the result of good high quality traffic which is mostly based on the quality of the content available on your blog/website. If you build high quality content then people will enjoy navigating through your site and therefore, create page views.

        In general, AdSense reports show the following fields of information:
        • Page Impression: how many times the page or pages containing the AdSense advertisement was shown to your blog/website visitors
        • Clicks: the number of times visitors clicked on an advertisement from your site
        • Page CTR: The clickthrough rate of an advertisement is defined as the number of clicks on an ad divided by the number of times the ad is shown (impressions), expressed as a percentage. (1) In most cases, a 2% click-through rate would be considered very successful, though the exact number is hotly debated.
        • CPC: is Cost Per Click. That is what Google pay you per click.
        • Estimated earnings: Your account balance for the time period selected. This amount is an estimate that is subject to change when your earnings are verified for accuracy at the end of every month.(2)
        Below are some ways that could help you to increase the page impressions:

        1. Navigation Menu

        Create a navigation structure that is clear and easy to follow. You want to make sure that once you have a visitor, they can easily make it to other parts of your blog. Creating links within your blog pages is one of the best ways to increase the number of impressions for your website.


        2. Posts Summary on Homepage

        A very good method to increase your page views is to have a summary of your posts on your blog/website homepage. That will force visitors of your blog to click on posts link / read more button in order to see the full article. To show only a part (excerpt) of Blogger posts, read this tutorial:
        Automatic Posts Summaries for Blogger with Thumbnails

        3. Improve Blog/Website Load Time

        If a blog’s pages load very slowly, then visitors will eventually lose patience and stop visiting more pages, sometimes sooner rather than later. A blog that has quick loading pages is a pleasure to browse and it encourages more clicks.

        4. Add a Popular Posts widget
        web hosting, forums, css, earn money

        Another great way to engage your readers to stay more on your site/blog and to browse through your content and make more pageviews is to add a Popular Posts Widget where you share some of the best posts on your blog.

        Here are some nice Popular Posts widgets for your Blogger blog:

        Popular Posts widget above Blogger Posts
        Multi-Colored Popular Posts widget


          5. Add a Random Posts Widget

          If you have loyal visitors who come to your blog on a daily basis, a popular article widget will become boring just because they see it every day, with same posts. A random posts widget will mix the articles so that the probability for a post to repeat will be very low.

          Want to add a Random Posts Widget for your Blogger blog? Then take a look at this tutorial:
          Random Posts widget with thumbnails

          6. Link to Related Posts at the End of a Post

          how to, tricks, awesome
          Displaying a related posts is a smart way for keeping your site visitors around. The widget links to stories that are relevant and interesting to readers of a particular post, keeping them engaged with your blog, and increasing your traffic.

          If you don't have it on your blog yet, see this Related Posts Widget tutorial for Blogger blogs: Add the Related Posts Widget with Thumbnails to Blogger


          7. Add internal links to your content using related anchor text

          Include a link in a new post to related information in a previous post. When you link to a previous post that you've written you should consider doing it so with descriptive words of the post, rather than generic words. (don't use simple words like "click here for more"). Adding links to previous articles will determine your visitors to view articles and automatically will be converted into page impressions.

          8. Provide links into your social networks profiles or forums

          Share your blog links on Facebook, Twitter or any other websites or popular forums. Answer to questions on the web. But be careful to not be too intrusive and always try to give pertinent info.
          You wouldn't want to support or to be considered as a spammer, don't you?

          9. Add a search box

          A lot of websites does not have a search box. As a result, the visitor will leave the site if he didn't find anything further relevant. For best results, you should be using the Google custom search widget. You can embed the Google search box directly in your blog. The search results will be more relevant than those that are provided by your default search box.


          10. Add Social media buttons 

          Give your visitors multiple options to tweet, bookmark and share your posts via Facebook as well as save your whole blog. Put social icons below your post and in the sidebar, make them visible and let them be found easily.

          11. Use a clean background for your posts and readable fonts

          Avoid dark backgrounds, tiny and sophisticated fonts, and make written content the visually most distinct part of your blog. If your main objective is to deliver a message and get the visitors reading your stuff, then you should make this process comfortable for them.

          12. Advertising

          And finally, getting people to your site may just be a matter of getting the word out. By using pay-per-click advertising, you can create an inexpensive advertising campaign to get more people to your site.

          Following these tips will surely increase your blog's page views, which will make your blog traffic high in the future. Good luck!