Showing posts with label posts. Show all posts

Recent Rotating Post Gadget with Excerpt For Blogger

This is a JavaScript code displaying the latest posts of any feed with the distinction of having two parts which can be used individually or combined.

At the top we will see a single post with the title (link), author, date and a brief summary of its content. In addition, this post will rotate automatically within a list whose number of elements will be decided by us.

At the bottom will be shown a full list with chosen posts and when we mouse over any of them, the post will be on top, breaking the automatic cycle.


But before installing anything let's see it in action to decide if it does what we want.

Loading...

How to Add Recent Rotating Posts Widget to Blogger

Step 1. Go to Layout > click on Add a Gadget link.


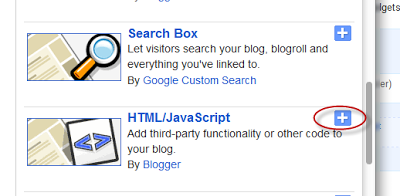
Step 2. From the pop-up windows, choose the HTML/Javascript gadget


Step 3. Paste this code inside the empty box:
<style>
.gfg-root {
width: 100%;
height : auto;
position : relative;
overflow : hidden;
margin: 0 auto;
text-align : center;
font-size: 12px;
border: 2px solid #CAD4E7;
}
.gfg-title {
font-size: 16px;
font-weight : bold;
color : #3D5A99;
background-color: #ECEEF5;
line-height : 1.4em;
overflow : hidden;
white-space : nowrap;
}
.gfg-entry {
background-color : white;
width : 100%;
height : 9.2em;
position : relative;
overflow : hidden;
text-align : left;
margin-top : 3px;
}
.gf-title a {
font-weight: bold;
color: #3F86C6;
}
.gfg-subtitle {
display: none;
}
.gfg-list {
position : relative;
overflow : hidden;
text-align : left;
}
.gfg-listentry {
line-height : 1.5em;
overflow : hidden;
white-space : nowrap;
text-overflow : ellipsis;
padding-left : 15px;
padding-right : 5px;
}
.gfg-listentry-odd {
background-color : #eeeeee;
}
.gfg-listentry-even {
background-color : #fefefe;
}
.gfg-listentry-highlight {
background: #748BB7;
}
.gfg-listentry-highlight:before {
position: absolute;
left: 0;
content: '\25BA ';
font-size: 14px;
color: #eee;
}
.gfg-listentry-highlight a {
color: #eee;
}
.gfg-root .gfg-entry .gf-result {
position : relative;
background-color : white;
width : auto;
height : 100%;
padding-left : 20px;
padding-right : 5px;
}
.gfg-root .gfg-entry .gf-result .gf-title {
font-size: 14px;
line-height : 1.2em;
overflow : hidden;
white-space : nowrap;
text-overflow : ellipsis;
margin-bottom : 2px;
}
.gfg-root .gfg-entry .gf-result .gf-snippet {
height : 3.8em;
color: #000000;
margin-top : 3px;
}
.clearFloat {
clear : both;
}
</style>
<script src="http://www.google.com/jsapi" type="text/javascript"></script><script src="http://www.google.com/uds/solutions/dynamicfeed/gfdynamicfeedcontrol.js" type="text/javascript"></script>
<script type="text/javascript">
function showGadget() {var feeds = [{title:'List',url:'http://helplogger.blogspot.com/feeds/posts/default?redirect=false&start-index=5&max-results=10'},];
new GFdynamicFeedControl(feeds, 'feedGadget',{title: 'Latest Posts', numResults : 10, displayTime : 5000, hoverTime : 500});} google.load("feeds", "1");
google.setOnLoadCallback(showGadget);
</script>
<div id="feedGadget">Loading...</div>

Customizations:


First is the feed address to display. The url http://helplogger.blogspot.com obviously, should be replaced with yours.

Next is start-index=5. This number indicates from which post we want to begin to show.

max-results=10 indicates the maximum number of posts that we will be reading from the feed, which is indicated in the start-index=5. This number always needs to be equal or greater to which we should see later and serves to set the number of posts that will be shown in the gadget. The easy thing would be to put 500 in order not to fail, but the higher the number is, the longer the gadget will take to load, so it's better to adjust to what we need to show.

Finally there are some parameters of the script:

title: 'Latest Posts', is the title which goes on top.
numResults: 10, number of posts that actually will be in the list
displayTime: 5000, the delay time between posts in the rotator (in milliseconds)
hoverTime: 500, minimum time for a item in the list to be displayed at the top.

If we want to hide the list and show only the posts, then change this part:
.gfg-list {
position : relative;
overflow : hidden;
text-align : left;
}
 to :
.gfg-list {
display:none;
}
and if we want to display only the list, then change this part:
.gfg-entry {
background-color : white;
width : 100%;
height : 9.2em;
position : relative;
overflow : hidden;
text-align : left;
margin-top : 3px;
}
to:
.gfg-entry {
display: none; }

Step 4. Save the gadget and we're done. Enjoy!

How to Create Drop Caps (Big First Letters) in Blogger/Blogspot

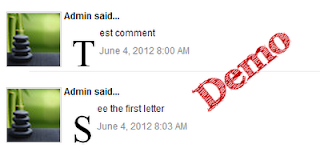
Here's another way you can customize your Blog. In this case, your Posts and Comment's first letter. The effect is a large first letter stretching down three or four lines with the text wrapped around. The drop cap letter can also use a different font and can be a different color to the rest of the text. You often see this style in newspapers, literature, magazines. In this tutorial i will show you how to apply automatically Magazine text style in Blogger Posts and Comments. So let's start adding it!

-> Add Drop Caps For Blogger Posts

drop caps, blogger blogspot, tutorials

-> Add Drop Caps For Blogger Comments

drop caps, first letter, blogger

Big First Letter for your Blogger / Blogspot Posts

Step 1.
  •  If you are using the old Blogger interface:
Go to Dashboard - Design - Edit HTML - Expand Widget Template (make a backup)
  • If you are using the new Blogger interface:
Go to Dashboard - Template - Edit HTML - Proceed - Expand Widget Template (make a backup)

Step 2. Search (CTRL + F) for this piece of code:

]]></b:skin>

Step 3. Just above it, add the following:

.capital:first-letter {
float: left;
display: block;
font-family: Times, serif, Georgia;
font-size: 40px;
color: #000000;
margin:0px 5px 0 0;
padding:0 0 0 10px;
}

Customize:

Color - change the color highlighted in blue with the value of your desired color
Size - to change the letter size, increase/decrease the value highlighted in pink.

Step 4. Now search for this code:

<data:post.body/>

Step 5. Then immediately before and after add the red fragments you see in the example below:

 <div class='capital'><data:post.body/></div>

Step 6. Save your template.

Important! If the above code is not working, add one of following codes from this example:


<p class="capital"><data:post.body/></p>

Or

<span class="capital"><data:post.body/></span>


Big First Letter For Blogger/Blogspot Comments

Step 1. Log in to your Blogger account, then go to Design (Layout) >> Edit HTML >> check the "Expand Widget Templates" box

Step 2. Search (CTRL + F) for this piece of code (if you have already added this code, skip step 2 & 3):

]]></b:skin>

Step 3. Add the following code just above ]]></b:skin>:

.capital:first-letter {
float: left;
display: block;
font-family: Times, serif, Georgia;
font-size: 40px;
color: #000000;
margin:0px 5px 0 0;
padding:0 0 0 10px;
}

Customize:

Color - change the color highlighted in blue with the value of your desired color
Size - to change the letter size, increase/decrease the value highlighted in pink.

Step 4. Then Search for this piece of code:

<data:comment.body/>

Step 5. Add the red codes before and after <data:comment.body/> as you can see in my example below:

<p class="capital"><data:comment.body/></p>

Step 6. Save your Template.

That's it! Now you have a cool drop cap first letter on your blog.
If you have any question, leave a comment below!

Show Blogger Image only in Homepage and Hide it in Post Page


To hide images/pictures from our blogger posts and to make them appear only in homepage, we will have to add just a small piece of CSS code in our template and then use the class "hidepic" each time we want to hide an image.

Just follow the next steps:

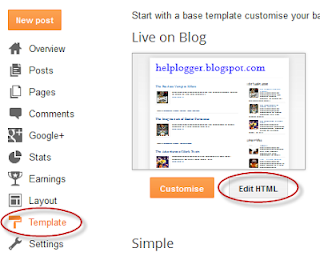
Step 1. Go to Dashboard - Template - Edit HTML ( click on Proceed button )


 Step 2. Select "Expand Widget Template" (make a backup)

     Step 3. Find (CTRL + F) this code in your template:

        }]]></b:skin>

    Step 4. Copy and paste the following code just below it

    <b:if cond='data:blog.pageType != &quot;index&quot;'>
    <style>
    .hidepic{
    display: none;
    }
    </style>
    </b:if>

    Step 5. Save the Template.

    Now everytime you create a post, firstly add the pic you want to hide and then switch to HTML tab where you'll see the HTML code of the image you have added that will look something like this:

    <div class="separator" style="clear: both; text-align: center;">
    <a href="https://blogger.googleusercontent.com/img/b/R29vZ2xl/AVvXsEjMYmUQVkbz_3-obLp6fgdWAbk2eu2pW_6KclR2HYUH1CGEuovRImgQPNoeJ7uapZRhpJSgONS2V43zrYElyXFjpk3eqkqZIvh-XXTgCQgqc2X9Xq3nbdmHDnDJV6nMAidC2F6HBgx2MMY/s1600/fire_bird_by_fhrankee-d32af8v.png" imageanchor="1" style="margin-left: 1em; margin-right: 1em;"><img border="0" height="320" src="https://blogger.googleusercontent.com/img/b/R29vZ2xl/AVvXsEjMYmUQVkbz_3-obLp6fgdWAbk2eu2pW_6KclR2HYUH1CGEuovRImgQPNoeJ7uapZRhpJSgONS2V43zrYElyXFjpk3eqkqZIvh-XXTgCQgqc2X9Xq3nbdmHDnDJV6nMAidC2F6HBgx2MMY/s320/fire_bird_by_fhrankee-d32af8v.png" width="320" /></a></div>

    Note: it should be at the exact location where your image has been added 
    (if the image is at the middle of the text, then the code should be found at the middle)

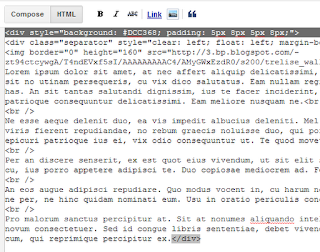
    Step 6. Replace "separator" with "hidepic" - see the screenshot below:


    If you need more help, please leave a comment below.

    Recent Posts Widget with Thumbnails for Blogger/Blogspot

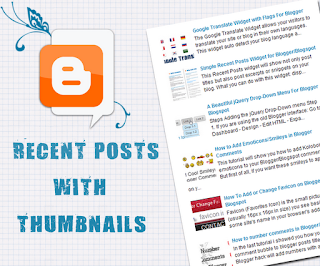
    A few days ago, I've posted a tutorial about How To Add A Simple Recent Posts Widget but today I want to present to you a very nice Recent Posts widget that comes along with posts thumbnails and post summary as well. If you want to know how to add this Recent Posts widget/gadget to your Blogger blog, then follow the steps below:

    recent posts, blogger widgets

    How to Add the Recent Posts Widget to Blogger

    Step 1. Go To Blogger > Layout and click on "Add a Gadget" link


    Step 2. From the pop-up window, scroll down and choose HTML/JavaScript


    Step 3. Paste inside the empty box, the following code:

    <div class="eggTray">
    <script src="http://helplogger.googlecode.com/svn/trunk/listbadge.js">{"pipe_id":"1a6640e2a78b2c6e736f2220529daae5","_btype":"list",
    "pipe_params":{"URL":"YOUR-BLOG/SITE-URL/feeds/posts/default"},
    "hideHeader":"false","height":"500","count": 8 }</script>
    <div style="font-family: arial, sans-serif; font-size: 9px;" class="ycdr"><a href="http://helplogger.blogspot.com/2012/05/recent-posts-widget-with-thumbnails-for.html" target="_blank" title="Grab this widget">Recent Posts Thumbnails</a> <a href="http://helplogger.blogspot.com/" target="_blank">Blogger Widget</a></div><noscript>Your browser does not support JavaScript!</noscript></div>
    <style type=text/css>
    .eggTray {margin:10px 0px;padding:0px;}
    .ybr li  {border-bottom:0px #cccccc dotted; padding:0px 0px 10px 0px!important;}
    .pipesTitle {padding-top:0px;}
    .pipesDescription {display:true;}
    .ycdr {background:transparent url(https://blogger.googleusercontent.com/img/b/R29vZ2xl/AVvXsEjTcEP4CEVkjKQs7_VtYWMIOZSifYUZkrqR6asSvNX7EfkgTTsAXThwYD7dobcr17rB2UOR5PNSYkOzKjUQT3dZH8iVYed5slGqS0cpi2Oy8N1vkZ-9k6XGqu_LvujhwnJDazsrPUeajks/s1600/logo.png) 0px 0px no-repeat; padding: 1px 0px 0px 19px; height:14px; margin: 4px 0px 0px 0px;line-height:14px;}
    .ycdr, .ycdr a {color:#999999;}
    .widget .popular-posts ul {padding-left:0;}
    </style>

    Step 4. Change YOUR-BLOG/SITE-URL with the url address of your site/blog (ex: http://helplogger.blogspot.com) and look to have no forward slash symbol "/" at the end of your url

    Note:
    • To disable the scroll bar, remove the number 500
    • By default, this widget is set to display a maximum of 8 recent posts. To change this number, replace the number 8 with the number of posts desired
    • if you want only the posts titles to appear, change true to none and "0" from padding-top:0px with 10

    Step 5. Save your widget. And you're done!

    If you need more help, leave your comment below.

    Simple Recent Posts Widget for Blogger/Blogspot

    The main advantage on this Recent Posts widget is that it will show not only post titles but also post excerpts or snippets and it's easy to customize/ apply different style on it. To style it into your own design, you just have to modify the CSS style - you can change the link or background color, the size and color of text/links.

    What you can do with this widget:
    • display post titles only
    • change the number of posts
    • change the number of characters of the post snippet/excerpt
    • show the post dates

    See the screenshot below:

    How to add Recent Posts Widget to Blogger

    Step 1. Log in to your Blogger Dashboard, then go to Layout and click on Add a Gadget link


    Step 2. From the pop-up window, scroll down and choose HTML/JavaScript


    Step 3. Select & Copy the code from one of the options below and paste it into the new HTML/JavaScript:

    Option 1: Recent posts widget with snippets

    <div id="hlrpsa">
    <script src="http://helplogger.googlecode.com/svn/trunk/recent-posts-with-snippets.js">
    </script>
    <script>
    var numposts = 5;var showpostdate = false;var showpostsummary = true;var numchars = 100;var standardstyling = true;
    </script>
    <script src="http://your-blog.blogspot.com/feeds/posts/default?orderby=published&amp;alt=json-in-script&amp;callback=showrecentposts">
    </script></div>
    <div id="rpdr" style="font-family: arial, sans-serif; font-size: 9px;">
    <a href="http://helplogger.blogspot.com/2012/04/recent-posts-widget-for-bloggerblogspot.html" target="_blank" title="Grab this Recent Posts Widget">Recent Posts Widget</a> by <a href="http://helplogger.blogspot.com" title="Recent Posts Widget">Helplogger</a></div>
    <noscript>Your browser does not support JavaScript!</noscript>
    <style type="text/css">
    #hlrpsa a {color: #0B3861; font-size: 13px;} #rpdr {background: url(https://blogger.googleusercontent.com/img/b/R29vZ2xl/AVvXsEjqCCRaxe_AdGRxQPvbmqlFl64EHdR6h5R1I3XD2jWlSmQRuPeD6L1eweuyyG5nnxVZlBVVVhiFNGBdDS5aSk-HKohXZkbOoGK5bNABvKj0uNKlyz8O9PdsCWVtkLwwG-eTiOpi5B-ZGjBw/s1600/blogger.png) 0px 0px no-repeat; padding: 1px 0px 0px 19px; height:14px; margin: 5px 0px 0px 0px;line-height:14px;}
    #rpdr, #rpdr a {color:#808080;}
    #hlrpsa { color: #999999; font-size: 11px; border-bottom:1px #cccccc dotted; margin-top:-10px; padding-bottom:10px;}
    .hlrps a {font-weight:bold; }
    .hlrpssumm {}
    </style>

    Option 2: Recent Posts Widget Showing Post Titles Only

    <div id="hlrpsb">
    <script style="text/javascript" src="http://helplogger.googlecode.com/svn/trunk/recent-posts-with-titles-only.js"></script>
    <script style="text/javascript">var numposts = 10;var showpostdate = false;var showpostsummary = false;var numchars = 100;var standardstyling = true;</script>
    <script src="http://your-blog.blogspot.com/feeds/posts/default?orderby=published&alt=json-in-script&callback=showrecentposts"></script></div>
    <div style="font-family: arial, sans-serif; font-size: 9px;" id="rpdr"><a href="http://helplogger.blogspot.com/2012/04/recent-posts-widget-for-bloggerblogspot.html" title="Grab this Recent Posts Widget" target="_blank">Recent Posts Widget</a> by <a href="http://helplogger.blogspot.com" title="Recent Posts Widget">Helplogger</a></div><noscript>Oops! Make sure JavaScript is enabled in your browser.</noscript>
    <style type=text/css>
    #hlrpsb a {color: #0B3861; font-size: 13px;} #rpdr {background: url( https://blogger.googleusercontent.com/img/b/R29vZ2xl/AVvXsEjqCCRaxe_AdGRxQPvbmqlFl64EHdR6h5R1I3XD2jWlSmQRuPeD6L1eweuyyG5nnxVZlBVVVhiFNGBdDS5aSk-HKohXZkbOoGK5bNABvKj0uNKlyz8O9PdsCWVtkLwwG-eTiOpi5B-ZGjBw/s1600/blogger.png ) 0px 0px no-repeat; padding: 1px 0px 0px 19px; height:14px; margin: 5px 0px 0px 0px;line-height:14px;}
    #rpdr, #rpdr a {color:#808080;}
    .bbrecpost2 {
    padding-top:6px;
    padding-bottom:6px;
    border-bottom: 1px #cccccc dotted; }
    </style>

    Step 4.
    • Change 5 (option 1) and 10 (option 2) with the number of posts you want to display. 
    • Change false to true if you want the posts dates to appear 
    • Change 100 (option 1) if you want more characters to be displayed.
    • To change the color and font size of the links, modify the values in blue (links) and violet (font-size)
    • To change the style of posts summary, modify the values in green (color) and orange (font size)
    • Replace the your-blog text with the name of your blog or if you have a custom domain change all the bolded line with your address like in this example:
    http://www.your-site.com/feeds/posts/default....

    Step 5. Save your widget. And that's it! Enjoy!

    If you need any help, leave a comment below.
    And if you liked this post, please consider sharing it. Thanks.

    How to Add Different Background Color or Image in Each Blogger Post

    When you have multiple authors on a blog and want to make a specific post stand-out, then you can change your posts background color or place a background image behind them, each time is needed. Therefore, this tutorial will show you how to style each post differently by adding some codes in your Blogger posts. (this won't take effect if you have the read more function enabled on your blog)


    How to Change the Color of the Post Background

    When you create a post, switch to HTML, near the Compose tab and add the following code just at the beginning and at the end of your post content.

    <div style="background-color: #DCC368; padding: 5px 8px 5px 8px;">
    Your text goes here...
    </div>

    • add the red line at the BEGINNING of your post.
    • add the div tag in blue at the END of your post.
    • replace the part in green with your own color (search for color's hex value)
    • "Your text here...." is where the Post content goes

    It's done by wrapping your Post content into a "div" element. You can apply this setting anytime to your already published posts as well or you can change/remove it later.

    Here's the example of the placed code in the Post Edit box:
    blogger posts color, backgrounds, blogger tricks

    How to Add a Background Image in a Blogger Post

    Add the following code just at the beginning and end of your post content.

    <div style="background-image: url(IMAGE-URL-HERE); background-repeat: no-repeat; ">
    Your text goes here...
    </div>

    • in green, you need to paste the URL address of your hosted picture (use Photobucket, Tinypic etc.)
    • the red line has to be added at the beginning of your post.
    • the blue part has to be added where your post ends.
    • "Your text here...." is where your Post content should be

    Now click Publish and you are done.

    Add a Popular Posts Gallery just above your Blogger posts

    The most strong and popular web design trend over last couple of years is a sliding horizontal panels also known as Sliders or Carousels. It's a very effective method to increase the web site usability and engage the user. This widget shows the most popular 10 posts on your blog just above your Blogger posts. You can see the Demo on my blog.
    Let's start adding it

    Before adding it you should know that this widget is not fully compatible with all templates, so please make a backup before making any changes to your blogger template. Now, follow these steps:

    1. If you are using the old Blogger interface: 
    • Go to Dashboard - Design - Edit HTML - (make a backup) Expand Widget Template 
    If you are using the new Blogger interface: 
    • Go to Dashboard - Template - Edit HTML - Proceed - (make a backup) Expand Widget Template
    2. Search (CTRL + F) for this piece of code:

    ]]></b:skin>

    3. Just above/before it, add the following code:

    #gallery{position:relative;margin:0 35px 20px;width:590px;height:126px;background:#ffffff}
    #gallery .belt{position:absolute;top:0;left:0;list-style-type:none}
    #gallery .panel{float:left;margin:20px;width:84px;height:86px;background:url(https://blogger.googleusercontent.com/img/b/R29vZ2xl/AVvXsEjhARbRfy3j_AigVUhkPZ6dpUZSvBmXP7i0JY6DZsLVl6i060wrEKStATOhcZnKWjA3Yh7UlGesuW4H4Wg3GMMS2gt6_9gFr3UNXUOTW6J-7Pr7iAon5BB6xa8ll0yYTvKANIIoji60wULN/s1600/bg-slider.png) bottom center no-repeat;overflow:hidden}
    #gallery .panel img{float:left;border:1px solid #DDD;margin:5px;width:72px;height:72px;background:#FFF;padding:0px}
    #gallery .panel img:hover{filter:alpha(opacity=50);-moz-opacity:0.5;-khtml-opacity:0.5;opacity:0.5}

    Note: you can adjust the size of gallery, changing the values in red (590 and 126).

    4. Now search for the following piece of code:

    </head>


    5. Just above/before it, add this code:

    <script src='http://ajax.googleapis.com/ajax/libs/jquery/1.4.2/jquery.min.js' type='text/javascript'/>
    <script src='http://helplogger.googlecode.com/svn/trunk/auto-slider.js' type='text/javascript'/>
    <script type='text/javascript'>
    //<![CDATA[
    stepcarousel.setup({
    galleryid: "gallery",
    beltclass: "belt",
    panelclass: "panel",
    autostep: {enable:true, moveby:1, pause:6000},
    panelbehavior: {speed:500, wraparound:true, persist:true},
    defaultbuttons: {enable: true, moveby: 2, leftnav: ["https://blogger.googleusercontent.com/img/b/R29vZ2xl/AVvXsEj_yRvYzHhwCE6bfkcdKqbwIF9g1TfLgFm5yS42mQHTow8eJueIvhbt10WI-MBxq7XgPa9IK1i0_q07_YFfxoA8Yn4IJdD4rfDmFIMiCD60yQsV_is4Z-IZqZZ5tvd1kWxEjGObCH6aXQQg/s1600/prev.png", -40, 36], rightnav: ["https://blogger.googleusercontent.com/img/b/R29vZ2xl/AVvXsEhInbUN6_1SRcWxE4uDJ5VRvsdyZNKKlBuPZmFHlzPoYbZKPqhCNPyC1TIWs33h3QoDUnw2Y6M9Cp2TYaQuvu-xbcrkuaMXBIygOWsD6QQjBCxp0i5KNYZyKiUBuVancbPeavo1hwLCW0f1/s1600/next.png", 2, 36]},
    contenttype: ["external"]
    })
    //]]>
    </script>

    Next thing to do is to place the widget just above the blogger posts.

    6. Search for this code:

    <b:section class='main' id='main' showaddelement='yes'>

    ...or if you can'find it, search for this one:

    <b:section class='main' id='main' showaddelement='no'>

    7. Just below it, add the following code:

    <b:widget id='PopularPosts2' locked='false' title='Popular Posts' type='PopularPosts'>
    <b:includable id='main'>
    <b:if cond='data:blog.url == data:blog.homepageUrl'>
    <div style='margin-top:20px;margin-bottom:70px;margin-left:-20px;'>
      <div id='gallery'>
       <ul class='belt'>
        <b:loop values='data:posts' var='post'>
         <li class='panel'>
          <b:if cond='data:showThumbnails == &quot;false&quot;'>
           <b:if cond='data:showSnippets == &quot;false&quot;'>
            <a expr:href='data:post.href' expr:title='data:post.title' rel='bookmark'><data:post.title/></a>
           <b:else/>
            <div class='item-title'>
             <a expr:href='data:post.href' expr:title='data:post.title' rel='bookmark'><data:post.title/></a>
            </div>
            <div class='item-snippet'>
             <data:post.snippet/>
            </div>
           </b:if>
          <b:else/>
           <a expr:href='data:post.href' expr:title='data:post.title' rel='bookmark'>
            <b:if cond='data:post.thumbnail'>
             <img expr:alt='data:post.title' expr:src='data:post.thumbnail'/>
            <b:else/>
             <img alt='no image' src='https://blogger.googleusercontent.com/img/b/R29vZ2xl/AVvXsEgpsChLaVTYHLoTaNmAoQsTEHg098adV1Wts6nGM7U-CDWP7xsKzEWgIwpob7WWhfQFppJ2MC4YyrXqto6plOXZzFZfVczzFRPZcsjZSECkQLnqvN1ibEhEw6R6vPPZktSkKBAmdNrtxRZf/s1600/no-image.PNG'/>
            </b:if>
           </a>
          </b:if>
         </li>
        </b:loop>
       </ul>
      </div></div></b:if>
     </b:includable>
    </b:widget>

    Note: delete the fragments of code in blue if you want this widget to be displayed in posts pages also.

    8. Preview and if everything is ok, Save the Template.

    A Simple Related Posts Widget For Blogger

    In the last tutorial, i've been talking about the Related Posts widget that shows related posts along with thumbnails just at the end of your blog articles. Some of the users, however, would prefer a simpler and cleaner displaying of their related posts so that it would show just the posts titles. So let's begin adding it!

    related post, related post blogger, blogger tricks

    How to add Related Posts Widget to Blogger

    Step 1. Go to Template >> Edit HTML and tick the "Expand Widget Templates" checkbox

    Step 2. Find the below tag

    </head>

    Step 3. And just above it, paste the following code:


    <!--Related Posts Scripts and Styles Start-->
    <!--Remove--><b:if cond='data:blog.pageType == &quot;item&quot;'>
    <style type='text/css'>
    #related-posts {
    float:center;
    text-transform:none;
    height:100%;
    min-height:100%;
    padding-top:5px;
    padding-left:5px;
    margin-top: 20px;
    }
    #related-posts .widget{
    padding-left:6px;
    margin-bottom:10px;
    }
    #related-posts .widget h2, #related-posts h2{
    font-size: 17px;
    font-weight: normal;
    color: black;
    font-family: Arial Narrow;
    margin-bottom: 0.75em;
    padding-top: 0em;
    }
    #related-posts a{
    font-size:16px;
    color: #555555;
    font-variant:small-caps;
    }
    #related-posts a:hover{
    text-decoration: none;
    color: #ffffff;
    font-weight: bold;
    }
    #related-posts ul{
    list-style-type:none;
    margin:0 0 0px 0;
    padding:0px;
    text-decoration:none;
    text-color:#000000
    }
    #related-posts ul li{
    list-style-type: none;
    border-left: 2px solid #1399CF;
    border-bottom: 1px dotted #1399CF;
    margin-bottom: 3px;
    padding-left: 30px;
    padding-top:0px;
    }

    #related-posts ul li:hover{
    background-color: #1399CF;
    border-left: 2px solid #B3CA3D;
    border-bottom: 1px dotted #B3CA3D;
    }
    </style>
    <script type='text/javascript'>
    var relatedpoststitle=&quot;Related Posts&quot;;
    </script>
    <script src='http://helplogger.googlecode.com/svn/trunk/related_posts.js' type='text/javascript'/>
    <!--Remove--></b:if>
    <!--Related Posts Scripts and Styles End-->

    Note:
    - if you want to change the size and color of 'Related Posts' title, change the bolded values (17 for the font size and black for the color)
    -to change the related post title color, replace the value in red;
    -to change the background color on mouseover, replace the color value in blue;

    Step 4. Now find (CTRL + F) the below line:

        <div class='post-footer'>

    Step 5. Just above it, paste the code below:

    <!-- Related Posts Code Start-->
    <!--Remove-->
    <b:if cond='data:blog.pageType == &quot;item&quot;'>
    <div id='related-posts'> <b:loop values='data:post.labels' var='label'> <b:if cond='data:label.isLast != &quot;true&quot;'> </b:if> <b:if cond='data:blog.pageType == &quot;item&quot;'> <script expr:src='&quot;/feeds/posts/default/-/&quot; + data:label.name + &quot;?alt=json-in-script&amp;callback=related_results_labels&amp;max-results=6&quot;' type='text/javascript'/></b:if></b:loop>
    <script type='text/javascript'> var maxresults=5; removeRelatedDuplicates(); printRelatedLabels(&quot;<data:post.url/>&quot;); </script> </div> <!--Remove--></b:if> <!-- Related Posts Code End-->

    Note: In order to change the number of maximum related posts being displayed for each label, search for the code max-results=5 and change the number "5" to any desired number.

    Step 6. Save Template

    Enjoy!!!

    How To Add Related Posts Widget To Blogger with Thumbnails

    Now here is a wonderful hack for displaying related posts beneath each of your blog posts, along with thumbnails. The related articles are chosen from other posts in that same category/label/tag. With this hack many of your readers will remain on your site for longer periods of time when they see related posts of interest.
    related post, related posts blogger, blogger widgets

    Steps adding the Related Posts Widget to Blogger/Blogspot

    Step 1. Go To Blogger Dashboard >> Template >>Edit HTML

    blogger template, edit html

    Step 2. Click anywhere inside the template's code and press the CTRL + F keys

    Step 3. Search for this piece of code by typing it inside the search box:
    </head>
    Step 4. Copy and paste the below code just before/above </head>
    <!--Related Posts with thumbnails Scripts and Styles Start-->
    <!-- remove --><b:if cond='data:blog.pageType == &quot;item&quot;'>
    <style type='text/css'>
    #related-posts{float:left;width:auto;}
    #related-posts a{border-right: 1px dotted #eaeaea;}
    #related-posts a:hover{background: #f2f2f2;}
    #related-posts h2{margin-top: 10px;background:none;font:18px Oswald;padding:3px;color:#999999; text-transform:uppercase;}
    #related-posts .related_img {margin:5px;border:4px solid #f2f2f2;width:100px;height:100px;transition:all 300ms ease-in-out;-webkit-transition:all 300ms ease-in-out;-moz-transition:all 300ms ease-in-out;-o-transition:all 300ms ease-in-out;-ms-transition:all 300ms ease-in-out;}
    #related-title {color:#222;text-align:center;padding: 0 10px;font-size:14px Oswald; line-height:16px;text-shadow:0 2px 2px #fff;height:28px;width:100px;}
    #related-posts .related_img:hover{border:4px solid #E8E8E8;opacity:.7;filter:alpha(opacity=70);-moz-opacity:.7;-khtml-opacity:.7}</style>
    <script type='text/javascript' src='http://helplogger.googlecode.com/svn/trunk/relatedposts.js' />
    <!-- remove --></b:if>
    <!--Related Posts with thumbnails Scripts and Styles End-->
    Note:
    - to change the width and height of thumbnails, modify the 100px value in red
    - to change the color and size of related posts titles, change the value in blue
    - remove the line in violet if you want the related posts to be displayed in homepage too

    Step 5. Now find the following code (you might find it twice, stop at the second one):
    <div class='post-footer'>
    Step 6. And just above it, copy and paste the below code:
    <!-- Related Posts with Thumbnails Code Start-->
    <b:if cond='data:blog.pageType == &quot;item&quot;'>
    <div id='related-posts'>
    <b:loop values='data:post.labels' var='label'>
    <b:if cond='data:label.isLast != &quot;true&quot;'>
    </b:if>
    <b:if cond='data:blog.pageType == &quot;item&quot;'>
    <script expr:src='&quot;/feeds/posts/default/-/&quot; + data:label.name + &quot;?alt=json-in-script&amp;callback=related_results_labels_thumbs&amp;max-results=5&quot;' type='text/javascript'/></b:if></b:loop>
    <script type='text/javascript'>
    var currentposturl=&quot;<data:post.url/>&quot;;
    var maxresults=5;
    var relatedpoststitle=&quot;<b>Related Posts:</b>&quot;;
    removeRelatedDuplicates_thumbs();
    printRelatedLabels_thumbs();
    </script>
    </div><div class='clear'/>
    </b:if>
    <b:if cond='data:blog.url == data:blog.homepageUrl'><b:if cond='data:post.isFirstPost'>
    <a href='http://helplogger.blogspot.com'><img alt='Blogger Tricks' src='https://blogger.googleusercontent.com/img/b/R29vZ2xl/AVvXsEjTLIKwyXxUNgo0dJZtbJlTqfRaeJDJKuHrNN96YnvImN07iJ81D0MgG-9qibBCI2X1-9-4vU_CeJg5vBTyiPGoEDchmqsLoOeZ4__pUWZg6_gYcMiexGHWW_3RdwT59JA7ZkBMLEJQwLJV/s1600/best+blogger+tips.png'/></a>
    </b:if></b:if><!-- Related Posts with Thumbnails Code End-->
    Note:
    - change the 5 value from max-results=5 with the number of posts you want to be displayed
    - if you want the related posts to be displayed on homepage too, then remove the lines in violet

    Step 7. Save the Template

    Enjoy :)

    Auto Read More with thumbnail for Blogger/Blogspot Posts

    This hack will summarize content and show only summary in Home page, Archives Page and Label Page using Automatic Read More simple script in your template. Using automatic read more on your blog will make your blog load faster by showing few post instead of the full post on the homepage.
    Automatic read more for blogger posts can be done by inputting some code into your blog templates.

    How to install Automatic Read More Hack for Blogger

    There are two options you can choose from:

    1. Auto readmore for all the posts:

    Step 1. Find (CRTL + F) this code:

    <data:post.body/>

    Step 2. And replace with this:

    <b:if cond='data:blog.pageType != &quot;item&quot;'>
     <b:if cond='data:blog.pageType != &quot;static_page&quot;'>
      <div>
       <b:if cond='data:post.thumbnailUrl'>
        <img class='post-thumbnail' expr:alt='data:post.title' expr:src='data:post.thumbnailUrl' width='72px' height='72px'/>
       </b:if>
       <data:post.snippet/>
      </div>
      <div class='jump-link'>
       <a expr:href='data:post.url' expr:title='data:post.title'><data:post.jumpText/></a>
      </div>
     <b:else/>
      <data:post.body/>
     </b:if>
    <b:else/>
     <data:post.body/>
    </b:if>

    2. Read more only for older posts (your latest post will appear normal):

    Find (CTRL + F) and replace <data:post.body/> with:

    <b:if cond='data:blog.pageType != &quot;item&quot;'>
     <b:if cond='data:blog.pageType != &quot;static_page&quot;'>
      <b:if cond='data:blog.url == data:blog.homepageUrl'>
       <b:if cond='data:post.isFirstPost == &quot;true&quot;'>
        <data:post.body/>
         <b:if cond='data:post.hasJumpLink'>
          <div class='jump-link'>
           <a expr:href='data:post.url + &quot;#more&quot;' expr:title='data:post.title'><data:post.jumpText/></a> 
          </div>
         </b:if>
       <b:else/>
        <div>
         <b:if cond='data:post.thumbnailUrl'>
          <img class='post-thumbnail' expr:alt='data:post.title' expr:src='data:post.thumbnailUrl' width='72px' height='72px'/>
         </b:if>
         <data:post.snippet/>
        </div>
        <div class='jump-link'>
         <a expr:href='data:post.url' expr:title='data:post.title'><data:post.jumpText/></a>
        </div>
       </b:if>
      <b:else/>
       <div>
        <b:if cond='data:post.thumbnailUrl'>
         <img class='post-thumbnail' expr:alt='data:post.title' expr:src='data:post.thumbnailUrl' width='72px' height='72px'/>
        </b:if>
        <data:post.snippet/>
       </div>
       <div class='jump-link'>
        <a expr:href='data:post.url' expr:title='data:post.title'><data:post.jumpText/></a>
       </div>
      </b:if>
     <b:else/>
      <data:post.body/>
     </b:if>
    <b:else/>
     <data:post.body/>
    </b:if>

    Settings:

    A. If you want the thumbnail to appear on the left:

    Step 1. Find (CTRL + F) the following piece of code:

    ]]></b:skin>

    Step 2. Just above it, paste this code:

    .post-thumbnail{float:left;margin-right:20px}

    B. If you want the thumbnail to appear on the right,

    Paste above ]]></b:skin> this code:

    .post-thumbnail{float:right;margin-left:20px}

    Click Preview and if it works, click Save Template.

    That's it, enjoy!

    Add Random Posts Widget to Blogger

    The Random Posts Widget will show random posts you have added to your blog. The main advantages of this widget is that it is loading pretty fast and shows thumbnails of your posts too, along with the comments link.

    How to add Random Posts Widget to Blogger

    Step 1. Log in to Blogger Dashboard, and select Template > Edit HTML (click on Proceed button if needed)


    Step 2. Select "Expand Widget Templates"

    Step 3. Find (CTRL + F) the following tag:

    ]]></b:skin>

    Step 4. Just above it, paste the code below :

    #random-posts img{float:left;margin-right:10px;border:1px solid #999;background:#FFF;width:36px;height:36px;padding:3px}

    Step 5. Save Template.

    Step 6. Go to Layout, click on Add a Gadget 

    random posts widget, random blogger

    Step 7. Add a new HTML/JavaScript Gadget
    random posts blogger

    Step 8. Paste the following code in the empy HTML box:

    <ul id='random-posts'>
    <script type='text/javaScript'>
    var rdp_numposts=5;
    var rdp_snippet_length=150;
    var rdp_info='yes';
    var rdp_comment='Comments';
    var rdp_disable='Comments Disabled';
    var rdp_current=[];var rdp_total_posts=0;var rdp_current=new Array(rdp_numposts);function totalposts(json){rdp_total_posts=json.feed.openSearch$totalResults.$t}document.write('<script type=\"text/javascript\" src=\"/feeds/posts/default?alt=json-in-script&max-results=0&callback=totalposts\"><\/script>');function getvalue(){for(var i=0;i<rdp_numposts;i++){var found=false;var rndValue=get_random();for(var j=0;j<rdp_current.length;j++){if(rdp_current[j]==rndValue){found=true;break}};if(found){i--}else{rdp_current[i]=rndValue}}};function get_random(){var ranNum=1+Math.round(Math.random()*(rdp_total_posts-1));return ranNum};
    </script>
    <script type='text/javaScript'>
    function random_posts(json){for(var i=0;i<rdp_numposts;i++){var entry=json.feed.entry[i];var rdp_posttitle=entry.title.$t;if('content'in entry){var rdp_get_snippet=entry.content.$t}else{if('summary'in entry){var rdp_get_snippet=entry.summary.$t}else{var rdp_get_snippet="";}};rdp_get_snippet=rdp_get_snippet.replace(/<[^>]*>/g,"");if(rdp_get_snippet.length<rdp_snippet_length){var rdp_snippet=rdp_get_snippet}else{rdp_get_snippet=rdp_get_snippet.substring(0,rdp_snippet_length);var space=rdp_get_snippet.lastIndexOf(" ");rdp_snippet=rdp_get_snippet.substring(0,space)+"&#133;";};for(var j=0;j<entry.link.length;j++){if('thr$total'in entry){var rdp_commentsNum=entry.thr$total.$t+' '+rdp_comment}else{rdp_commentsNum=rdp_disable};if(entry.link[j].rel=='alternate'){var rdp_posturl=entry.link[j].href;var rdp_postdate=entry.published.$t;if('media$thumbnail'in entry){var rdp_thumb=entry.media$thumbnail.url}else{rdp_thumb="https://blogger.googleusercontent.com/img/b/R29vZ2xl/AVvXsEh0JbdARo1FBwiAcR3-ACp_SDSM5MU21w2mA6ivvtH-Gd6hjHRoafhtG2vt3xpS-QddDDzpoZ6tvG95Jla4no-ELeoNCfvQdJpnryesm8WUKNxLe0V6RggBPmlRkI-KN6vhbUK0JPvrNks/s1600/default.jpg"}}};document.write('<li>');document.write('<img alt="'+rdp_posttitle+'" src="'+rdp_thumb+'"/>');document.write('<div><a href="'+rdp_posturl+'" rel="nofollow" title="'+rdp_snippet+'">'+rdp_posttitle+'</a></div>');if(rdp_info=='yes'){document.write('<span>'+rdp_postdate.substring(8,10)+'/'+rdp_postdate.substring(5,7)+'/'+rdp_postdate.substring(0,4)+' - '+rdp_commentsNum)+'</span>'}document.write('<div style="clear:both"></div></li>')}};getvalue();for(var i=0;i<rdp_numposts;i++){document.write('<script type=\"text/javascript\" src=\"/feeds/posts/default?alt=json-in-script&start-index='+rdp_current[i]+'&max-results=1&callback=random_posts\"><\/script>')};
    </script>
    </ul>

    Note: Replace no. 5 with the number of posts you want to be show.

    Step 9. Press Save and Enjoy!

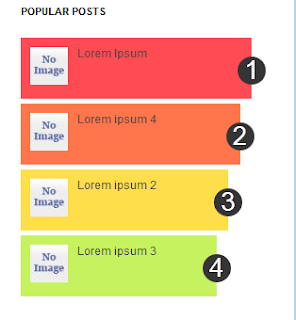
    Add Multi-Colored Popular Posts to Blogger

    Popular Posts is a widget provided by Blogger that displays the most viewed posts on the blog in the last 7 days, last month and of all time. It has three displaying modes: display title only, display title with image thumbnail or display title along with the posts snippets.

    To customize this popular posts widget, we have to add a new variable and some CSS codes to our blogger template. So let's begin:

    popular posts widget, blogger gadgets


    How to add multi-colored popular posts to Blogger

    Step 1. Login to your Blogger Dashboard, go to Design >> Edit HTML

    popular posts widget, blogger widgets

    Step 2. Select "Expand Widget Templates" (make a backup first)

    Step 3. Search for the following tag:

    /* Variable definitions
       ====================

    Note: If you can't find it, paste it below the autor information that is usually below this tag (CTRL + F):

     <b:skin><![CDATA[/* 

    ...and should end up with this symbol:
     
     ----------------------------------------------- */

    Step 4. Copy and paste just below/after this tag, the next code:

    <Group description="PopularPosts Backgrounds" selector="#PopularPosts1">
    <Variable name="PopularPosts.background.color1" description="background color1" type="color" default="#fa4242" value="#ff4c54"/>
    <Variable name="PopularPosts.background.color2" description="background color2" type="color" default="#ee6107" value="#ff764c"/>
    <Variable name="PopularPosts.background.color3" description="background color3" type="color" default="#f0f" value="#ffde4c"/>
    <Variable name="PopularPosts.background.color4" description="background color4" type="color" default="#ff0" value="#c7f25f"/>
    <Variable name="PopularPosts.background.color5" description="background color5" type="color" default="#0ff" value="#33c9f7"/>
    </Group>

    Step 5. Search for the following piece of code:

    ]]></b:skin>

    Step 6. Just above/before it, add this code:

    #PopularPosts1 ul{margin:0;padding:5px 0;list-style-type:none}
    #PopularPosts1 ul li{position:relative;margin:5px 0;border:0;padding:10px}
    #PopularPosts1 ul li:first-child{background:$(PopularPosts.background.color1);width:90%}
    #PopularPosts1 ul li:first-child:after{content:"1"}
    #PopularPosts1 ul li:first-child + li{background:$(PopularPosts.background.color2);width:85%}
    #PopularPosts1 ul li:first-child + li:after{content:"2"}
    #PopularPosts1 ul li:first-child + li + li{background:$(PopularPosts.background.color3);width:80%}
    #PopularPosts1 ul li:first-child + li + li:after{content:"3"}
    #PopularPosts1 ul li:first-child + li + li + li{background:$(PopularPosts.background.color4);width:75%}
    #PopularPosts1 ul li:first-child + li + li + li:after{content:"4"}
    #PopularPosts1 ul li:first-child + li + li + li + li{background:$(PopularPosts.background.color5);width:70%}
    #PopularPosts1 ul li:first-child + li + li + li + li:after{content:"5"}
    #PopularPosts1 ul li:first-child:after,#PopularPosts1 ul li:first-child + li:after,#PopularPosts1 ul li:first-child + li + li:after,#PopularPosts1 ul li:first-child + li + li + li:after,#PopularPosts1 ul li:first-child + li + li + li + li:after{position:absolute;top:20px;right:-15px;border-radius:50%;background:#353535;width:30px;height:30px;line-height:1em;text-align:center;font-size:28px;color:#fff}
    #PopularPosts1 ul li .item-thumbnail{float:left;border:0;margin-right:10px;background:transparent;padding:0;width:40px;height:40px}
    #PopularPosts1 ul li a{font-size:12px;color:#444;text-decoration:none}
    #PopularPosts1 ul li a:hover{color:#222;text-decoration:none}

    Step 7. Now find the following code:

    <b:widget id='PopularPosts1' locked='false' title='Popular Posts' type='PopularPosts'>

    Step 8. Delete it until you reach at this tag (delete the </b:widget> also):

    </b:widget>

    Note: Be very careful when removing it. The entire fragment of code should look like this:

    <b:widget id='PopularPosts1' locked='false' title='Popular Posts' type='PopularPosts'>
    <b:includable id='main'>
      <b:if cond='data:title'><h2><data:title/></h2></b:if>
      <div class='widget-content popular-posts'>
        <ul>
          <b:loop values='data:posts' var='post'>
          <li>
            <b:if cond='data:showThumbnails == &quot;false&quot;'>
              <b:if cond='data:showSnippets == &quot;false&quot;'>
                <!-- (1) No snippet/thumbnail -->
                <a expr:href='data:post.href'><data:post.title/></a>
              <b:else/>
                <!-- (2) Show only snippets -->
                <div class='item-title'><a expr:href='data:post.href'><data:post.title/></a></div>
                <div class='item-snippet'><data:post.snippet/></div>
              </b:if>
            <b:else/>
              <b:if cond='data:showSnippets == &quot;false&quot;'>
                <!-- (3) Show only thumbnails -->
                <div class='item-thumbnail-only'>
                  <b:if cond='data:post.thumbnail'>
                    <div class='item-thumbnail'>
                      <a expr:href='data:post.href' target='_blank'>
                        <img alt='' border='0' expr:height='data:thumbnailSize' expr:src='data:post.thumbnail' expr:width='data:thumbnailSize'/>
                      </a>
                    </div>
                  </b:if>
                  <div class='item-title'><a expr:href='data:post.href'><data:post.title/></a></div>
                </div>
                <div style='clear: both;'/>
              <b:else/>
                <!-- (4) Show snippets and thumbnails -->
                <div class='item-content'>
                  <b:if cond='data:post.thumbnail'>
                    <div class='item-thumbnail'>
                      <a expr:href='data:post.href' target='_blank'>
                        <img alt='' border='0' expr:height='data:thumbnailSize' expr:src='data:post.thumbnail' expr:width='data:thumbnailSize'/>
                      </a>
                    </div>
                  </b:if>
                  <div class='item-title'><a expr:href='data:post.href'><data:post.title/></a></div>
                  <div class='item-snippet'><data:post.snippet/></div>
                </div>
                <div style='clear: both;'/>
              </b:if>
            </b:if>
          </li>
          </b:loop>
        </ul>
        <b:include name='quickedit'/>
      </div>
    </b:includable>
    </b:widget>

    Step 9. After you have deleted the above code, paste the following in its place:

    <b:widget id='PopularPosts1' locked='false' title='Popular Posts' type='PopularPosts'>
    <b:includable id='main'>
       <b:if cond='data:title'>
        <h2><data:title/></h2>
       </b:if>
       <div class='widget-content popular-posts'>
        <ul>
         <b:loop values='data:posts' var='post'>
          <li>
           <b:if cond='data:showThumbnails == &quot;false&quot;'>
            <b:if cond='data:showSnippets == &quot;false&quot;'>
             <a expr:href='data:post.href' expr:title='data:post.title' rel='bookmark'><data:post.title/></a>
            <b:else/>
             <a expr:href='data:post.href' expr:title='data:post.snippet' rel='bookmark'><data:post.title/></a>
            </b:if>
           <b:else/>
            <b:if cond='data:showSnippets == &quot;false&quot;'>
             <b:if cond='data:post.thumbnail'>
              <img class='item-thumbnail' expr:alt='data:post.title' expr:src='data:post.thumbnail'/>
             <b:else/>
              <img alt='no image' class='item-thumbnail' src='https://blogger.googleusercontent.com/img/b/R29vZ2xl/AVvXsEh0JbdARo1FBwiAcR3-ACp_SDSM5MU21w2mA6ivvtH-Gd6hjHRoafhtG2vt3xpS-QddDDzpoZ6tvG95Jla4no-ELeoNCfvQdJpnryesm8WUKNxLe0V6RggBPmlRkI-KN6vhbUK0JPvrNks/s1600/default.jpg'/>
             </b:if>
             <a expr:href='data:post.href' expr:title='data:post.title' rel='bookmark'><data:post.title/></a>
             <div class='clear'/>
            <b:else/>
             <b:if cond='data:post.thumbnail'>
              <img class='item-thumbnail' expr:alt='data:post.title' expr:src='data:post.thumbnail'/>
             <b:else/>
              <img alt='no image' class='item-thumbnail' src='https://blogger.googleusercontent.com/img/b/R29vZ2xl/AVvXsEh0JbdARo1FBwiAcR3-ACp_SDSM5MU21w2mA6ivvtH-Gd6hjHRoafhtG2vt3xpS-QddDDzpoZ6tvG95Jla4no-ELeoNCfvQdJpnryesm8WUKNxLe0V6RggBPmlRkI-KN6vhbUK0JPvrNks/s1600/default.jpg'/>
             </b:if>
             <a expr:href='data:post.href' expr:title='data:post.snippet' rel='bookmark'><data:post.title/></a>
             <div class='clear'/>
            </b:if>
           </b:if>
          </li>
         </b:loop>
        </ul>
       </div>
      </b:includable>
    </b:widget>

    Step 10. Save template.

    Settings

    - Go back to Layout  and click on the edit link of Popular Posts widget.

    Select to "display up to 5 posts", then Save the widget.


    - You can easily change the background color of the popular posts widget, going to Template >> Customize  >> Advanced >> PopularPostsBackground and there you can select any color you want.


    You're done!

    If you are enjoying reading this blog, please like & subscribe for more tutorials.
    For any questions or suggestions, leave a comment below.