Showing posts with label how to. Show all posts

How To Add Snow In The Background of Your Blog Using CSS

falling snow, snow, winter background, bloggerToday we’re going to go over a super simple CSS technique that you can use to make it snow on your Blogger blog. It seems particularly attractive since it doesn't require scripts, only CSS and three small images.

An advantage of this method is that by not using scripts doesn't overload the blog, the disadvantage is that users with not so modern browsers, will not be able to see it (in Internet Explorer works for version 10 and up).

The snow will fall in the background of the blog, which, in addition, prevent interfering with links or content (because the flakes are images), also prevent blocking the visibility of the content of the blog.

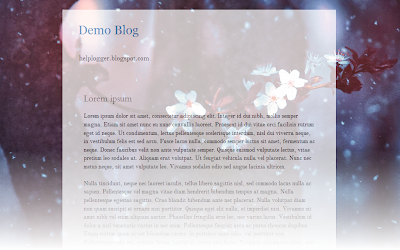
You can see the demo in this test blog.


How To Add Falling Snow To Blogger Blogspot

Step 1. Go to Template and click on the Edit HTML button:


Step 2. Click the small arrow on the left of <b:skin>...</b:skin> to expand the style (screenshot 1), then click anywhere inside the code area to search (using CTRL + F) for the ]]></b:skin> tag (screenshot 2) and add this code just above it:

/* Snow falling for Blogger
----------------------------------------------- */
@keyframes snow {
0% {background-position: 0px 0px, 0px 0px, 0px 0px;}
100% {background-position: 500px 1000px, 400px 400px, 300px 300px;}
}

@-moz-keyframes snow {
0% {background-position: 0px 0px, 0px 0px, 0px 0px;}
100% {background-position: 500px 1000px, 400px 400px, 300px 300px;}
}

@-webkit-keyframes snow {
0% {background-position: 0px 0px, 0px 0px, 0px 0px;}
100% {background-position: 500px 1000px, 400px 400px, 300px 300px;}
}

@-ms-keyframes snow {
0% {background-position: 0px 0px, 0px 0px, 0px 0px;}
100% {background-position: 500px 1000px, 400px 400px, 300px 300px;}
}

#falling-snow {
background-image: url(https://blogger.googleusercontent.com/img/b/R29vZ2xl/AVvXsEib1KBIV0mOU8e9YUuObd2NbTKyy68uZmbiz3RJq10cMB8qRLH3LrkBMdnOYS45ynBG9vuMJT3OY_TV6D5fOMNb8TGazllvlYNDR9zMvP0UaJBsrp11DXU9bZwIn1ETnMOLh29sZOAs5WeQ/s1600/snow.png), url(https://blogger.googleusercontent.com/img/b/R29vZ2xl/AVvXsEgg0yXjsMy5I87SJgQEY-8QkHBNcMYi3Sb4_3UgBR8Dd29DNPnVqHGtkMB3ikpXgBQuQ9BaBMrBJbpKNbDuhA3mIWX3gQcpBWST4JwvRlFZc3FkC7slHMcq-wD31DrNYPCX0QtDAVcm0CTB/s1600/snow3.png), url(https://blogger.googleusercontent.com/img/b/R29vZ2xl/AVvXsEhB0XxZfGylWMM4SNRsjtQDabQgTrszmioAzUplEQImvVoKEOtTBfav4oz4SYeyTccEiaKXXahfkFHyIt-OZgYGo0vstH9wholbDXVJ3lMWKYMxI5VYwVJjFmhSMhil_hRQRxWMBAAgNdZ-/s1600/snow2.png);
-webkit-animation: snow 20s linear infinite;
-moz-animation: snow 20s linear infinite;
-ms-animation: snow 20s linear infinite;
animation: snow 20s linear infinite;
}


Screenshot 1: 


Screenshot 2:


Step 3. Now, search (CTRL + F) for the <body> tag or this line:

<body expr:class='&quot;loading&quot; + data:blog.mobileClass'>

Step 4. And just below, add this:

<div id='falling-snow'>

Step 5. Finally, find the </body> tag (CTRL + F) and add the following just above it:

</div>

Step 6. Save the changes and that's it. Enjoy!!! :)

As you can see this tricks is very simple and easy to install, does not block the visibility of blog's content and the best is that it has no scripts, only CSS and nothing else.

Redirect Blogger 404 Error (Page Not Found) To Homepage

Whenever, by mistake, we or a user misspells an URL inexistent in our blog, it automatically redirects to the 404 error page (page not found). A message like this would appear:

"Sorry, the page you were looking for in this blog does not exist."

how to redirect blogger 404 error to homepage
And probably this will not make a good impression on the greatest potential users of our blog. Before the user clicks the back button or close the window/browser's tab, thus leaving our site forever, we may want to redirect 404 error in Blogger to a page, where are chances that the visitor will continue reading our blog.

One of the most used methods is the "meta refresh" but the problem with this method is that it breaks navigation (doesn't allow returning back). In this case, the best method is by using Javascript which will be shown below.

Redirect Blogger 404 Error with Javascript


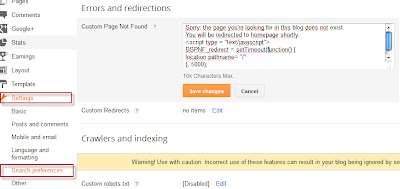
First of all, go to your Blogger dashboard and then to Settings > Search preferences > Custom Page Not Found.

redirect 404 error page in blogger to homepage

Copy and paste the following code:
Sorry, the page you're looking for in this blog does not exist.
You will be redirected to homepage shortly.
<script type = "text/javascript">
BSPNF_redirect = setTimeout(function() {
location.pathname= "/"
}, 5000);
</script>
The message which is going to be displayed can be edited as you want. If you are willing to redirect your blog 404 error page to another page other than your home page, just replace pathname to href and / with the url of your page. And finally, the number 5000 is the delay expressed in milliseconds. You can edit any value if this is more convenient.

Next thing to do is to save all changes made in this section and do a little test to check if the code works well. You can enter a nonexistent URL on your blog, and see if the 404 error page added previously appears, followed by a redirection after 5 seconds. That's it!

Create a Background Slideshow for Blogger

In the previous post we saw how to make the blog's background fill the screen regardless of the resolution of the monitor. The method that we'll use now with jQuery is a plugin called BackStretch which also has the option of creating a slideshow of pictures as a blog wallpaper without losing the property of adjusting to the width and height of the screen.

slideshow for blogger, blogger widgets

What we will do in this entry is just this, try to make the blog's background to have some images that are changing, all with fade effect between each transition.

You can see an example in this demo blog.

To put this slideshow in the blog's background, just go to Template - Edit HTML and before </head> add the following code:
<script src='http://ajax.googleapis.com/ajax/libs/jquery/1.10.2/jquery.min.js' type='text/javascript'/>
<script>
//<![CDATA[
/*
* jQuery Backstretch
* Version 1.2.8
* http://srobbin.com/jquery-plugins/jquery-backstretch/
* Add a dynamically-resized background image to the page
* Copyright (c) 2012 Scott Robbin (srobbin.com)
* Licensed under the MIT license
* https://raw.github.com/srobbin/jquery-backstretch/master/LICENSE.txt
*/
;(function(a){a.backstretch=function(p,b,l){function s(){if(p){var b;0==c.length?c=a("<div />").attr("id","backstretch").css({left:0,top:0,position:m?"fixed":"absolute",overflow:"hidden",zIndex:-999999,margin:0,padding:0,height:"100%",width:"100%"}):c.find("img").addClass("deleteable");b=a("<img />").css({position:"absolute",display:"none",margin:0,padding:0,border:"none",zIndex:-999999,maxWidth:"none"}).bind("load",function(d){var b=a(this),e;b.css({width:"auto",height:"auto"});e=this.width||a(d.target).width();d=this.height||a(d.target).height();n=e/d;q();b.fadeIn(g.speed,function(){c.find(".deleteable").remove();"function"==typeof l&&l()})}).appendTo(c);0==a("body #backstretch").length&&(0===a(window).scrollTop()&&window.scrollTo(0,0),a("body").append(c));c.data("settings",g);b.attr("src",p);a(window).unbind("resize.backstretch").bind("resize.backstretch",function(){"onorientationchange"in window&&window.pageYOffset===0&&window.scrollTo(0,1);q()})}}function q(){try{j={left:0,top:0},rootWidth=h=o.width(),rootHeight=r?window.innerHeight:o.height(),f=h/n,f>=rootHeight?(k=(f-rootHeight)/2,g.centeredY&&(j.top="-"+k+"px")):(f=rootHeight,h=f*n,k=(h-rootWidth)/2,g.centeredX&&(j.left="-"+k+"px")),c.css({width:rootWidth,height:rootHeight}).find("img:not(.deleteable)").css({width:h,height:f}).css(j)}catch(a){}}var t={centeredX:!0,centeredY:!0,speed:0},c=a("#backstretch"),g=c.data("settings")||t;c.data("settings");var o,m,r,n,h,f,k,j;b&&"object"==typeof b&&a.extend(g,b);b&&"function"==typeof b&&(l=b);a(document).ready(function(){var b=window,d=navigator.userAgent,c=navigator.platform,e=d.match(/AppleWebKit\/([0-9]+)/),e=!!e&&e[1],f=d.match(/Fennec\/([0-9]+)/),f=!!f&&f[1],g=d.match(/Opera Mobi\/([0-9]+)/),h=!!g&&g[1],i=d.match(/MSIE ([0-9]+)/),i=!!i&&i[1];o=(m=!((-1<c.indexOf("iPhone")||-1<c.indexOf("iPad")||-1<c.indexOf("iPod"))&&e&&534>e||b.operamini&&"[object OperaMini]"==={}.toString.call(b.operamini)||g&&7458>h||-1<d.indexOf("Android")&&e&&533>e||f&&6>f||"palmGetResource"in window&&e&&534>e||-1<d.indexOf("MeeGo")&&-1<d.indexOf("NokiaBrowser/8.5.0")||i&&6>=i))?a(window):a(document);r=m&&window.innerHeight;s()});return this}})(jQuery);
//]]>
</script>
<script>
//<![CDATA[
var images = [
 "Image URL",
 "Image URL",
 "Image URL",
 "Image URL",
 "Image URL",
  ];

  $(images).each(function(){
 $('<img/>')[0].src = this;
  });
  var index = 0;
$.backstretch(images[index], {speed: 1000});
  var slideshow = setInterval(function() {
  index = (index >= images.length - 1) ? 0 : index + 1;
    $.backstretch(images[index]);
  }, 5000);
//]]>
</script>
Here add the URLs of the images that will be the background of your blog.
If you would like to add more pictures, just add after the var images = [ another line like this:
 "Image URL",
The images will be changing in the order you have added them, if you want these to appear in a random order, then change the second part of the code with this:
<script>
//<![CDATA[
var images=new Array();
images[ 1 ]="Image URL";
images[ 2 ]="Image URL";
images[ 3 ]="Image URL";
images[ 4 ]="Image URL";
images[ 5 ]="Image URL";

  Array.prototype.shuffle = function() {
  var len = this.length;
  var i = len;
  while (i--) {
  var p = parseInt(Math.random()*len);
  var t = this[i];
  this[i] = this[p];
  this[p] = t;
  }
};

  images.shuffle();
  $(images).each(function(){
 $('<img/>')[0].src = this;
  });
  var index = 0;
$.backstretch(images[index], {speed: 1000});
  var slideshow = setInterval(function() {
  index = (index >= images.length - 1) ? 0 : index + 1;
    $.backstretch(images[index]);
  }, 5000);
//]]>
</script>
You can also add more pictures by adding a line like this:
images[ 6 ]="Image URL";
But you will see that in this case there are some consecutive numbers in blue, so if you add another such as 6, then the next one should be 7, etc..

In both cases you can change the duration of each image which is in the 5000 value that is at the end of the script.
The advantage of this slideshow in the blog's background is that images are automatically resized to the size of the monitor, so that, no matter of the resolution, it should look good.

It is worth remembering that if you are using Scriptaculous, you have to make some changes, and if you already use jQuery, should leave only one version.

Author page | Backstretch