Numbered comments on threaded comments for Blogger/Blogspot

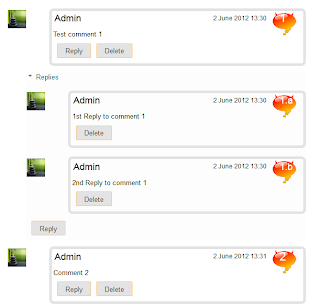
In a past tutorial, I've been talking about how you can add numbered comments to your blogger blog and today we'll learn how we can add numbered comments along with comment bubbles on the threaded comments as well.

What the following CSS trick will do for you:
  1. When the general block of comments is initiating (.comments-content) a counter called countcomments activates and starts with an initial value of 1. 
  2. Then, each time the code flow goes through a review of any level, either a principal or a reply comment (.comment-thread li), content will bring us in front (:before) of the body of the comment, the number that is the counter at the time.
  3. Then is incremented in one unit the counter (counter-increment).
See the screenshot:
count comments, comment bubble, forum, blogger

Isn't that great? Well, i'm pretty sure many of you have been waiting for this cool trick. So let's begin applying it for our threaded comments system.

Steps to add bubble comments count

Step 1: Go to Dashboard - Template - Edit HTML (click on Proceed if needed)

    ...Expand Widget Templates:


    Step 2: Search (CTRL + F) for this piece of code:

    ]]></b:skin>

    Step 3: Add the following code just above it:

    .comment-thread ol {
    counter-reset: countcomments;
    }
    .comment-thread li:before {
    content: counter(countcomments,decimal);
    counter-increment: countcomments;
    float: right;
    z-index: 2;
    position:relative;
    font-size: 22px;
    color: #555555;
    padding-left:10px; 
    padding-top:3px; 
    background: url(
    https://blogger.googleusercontent.com/img/b/R29vZ2xl/AVvXsEgSL6Tn0Q10ghnzwweQES-5FqX-0l5AQH-B4Qa4Rh_ahay_xomhO9Bu4TNfXdWaDvp77EkNHee_nxiSW-alRux6zGBdM3gef5plvMWs1cuxpqZRZf8lWIwQvaCFxvwL5FaD8XsEPeakpXsO/s1600/comment+bubble2.png) no-repeat;
    margin-top:7px; 
    margin-left:10px; 
    width: 50px; /*image-width size*/
    height: 48px; /*image-height size*/ 

    }
    .comment-thread ol ol {
    counter-reset: contrebasse;
    }
    .comment-thread li li:before {
    content: counter(countcomments,decimal) "." counter(contrebasse,lower-latin);
    counter-increment: contrebasse;
    float: right;
    font-size: 18px;
    color: #666666;
    }

    Note:
    • for no bubble icon, remove the code in red (including the blue code)
    • to change the comment bubble, replace the code in blue with the URL address of your own icon. If you're not sure what icon you should use, you can find some cool icons in my previous posts (see these tutorials here and here)
    • to change the position of comments count, increase/decrease the values (3 & 10) from padding-top and padding-left
    • to change the position of comments bubble/icon, change the values (10 & 7) from margin-left and margin-top
    Step 4: Now Save the Template and you're done!

    If you enjoy reading this blog, please share and subscribe. For any questions, leave a comment below.
    How to add “Email Subscription Form” to Blogger Blogspot

    email subscription form, blogger blogspot, gadgets
    When you are providing useful information in your blog, then many times some readers will need to get the latest updates from your blog. For that purpose, you need an Email Subscription Form in your blog, so that the interested visitors can easily get the latest updates.


    To add email or Feed Subscription Form to your blogger blog (blogspot) is very easy.
    Just follow the next steps:

    1. Log in to Blogger, then go to Layout > click on "Add a Gadget" link:


     2. From the pop-up window, scroll down and click on the "HTML/JavaScript" gadget:


     3. Paste the following code inside the empty box:
    <style>
    .hl-email{
    background:url(https://blogger.googleusercontent.com/img/b/R29vZ2xl/AVvXsEj1fqULeJ8pOpqpLHoXSRbHY2Xqk-_09RsiQTJVPj8b2JHakVKOl0-BHgZL_lXdVtEKwh6OonA7nr5j2bjb7ne4cA2i6iTHX_mUuSXcHRmCaw8mLfiu5td9MUAeXLJWnWhangeNgkF8tjc/s1600/mail.png) no-repeat 0px 12px ;
    width:300px;
    padding:10px 0 0 55px;
    float:left;
    font-size:1.4em;
    font-weight:bold;
    margin:0 0 10px 0;
    color:#686B6C;
    }
    .hl-emailsubmit{
    background:#9B9895;
    cursor:pointer;
    color:#fff;
    border:none;
    padding:3px;
    text-shadow:0 -1px 1px rgba(0,0,0,0.25);
    -moz-border-radius:6px;
    -webkit-border-radius:6px;
    border-radius:6px;
    font:12px sans-serif;
    }
    .hl-emailsubmit:hover{
    background:#E98313;
    }
    .textarea{
    padding:2px;
    margin:6px 2px 6px 2px;
    background:#f9f9f9;
    border:1px solid #ccc;
    resize:none;
    box-shadow:inset 1px 1px 1px rgba(0,0,0,0.1);
    -moz-box-shadow:inset 1px 1px 1px rgba(0,0,0,0.1);
    -webkit-box-shadow:inset 1px 1px 1px rgba(0,0,0,0.1); font-size:13px;
    width:130px;
    color:#666;}
    </style>
    <div class="hl-email">
    Subscribe via Email <form action="http://feedburner.google.com/fb/a/mailverify" id="feedform" method="post" target="popupwindow" onsubmit="window.open('http://feedburner.google.com/fb/a/mailverify?uri=helplogger', 'popupwindow', 'scrollbars=yes,width=550,height=520');return true">
    <input gtbfieldid="3" class="textarea" name="email" onblur="if (this.value == &quot;&quot;) {this.value = &quot;Enter email address here&quot;;}" onfocus="if (this.value == &quot;Enter email address here&quot;) {this.value = &quot;&quot;;}" value="Enter email address here" type="text" />
    <input type="hidden" value="helplogger" name="uri"/><input type="hidden" name="loc" value="en_US"/>
    <input class="hl-emailsubmit" value="Submit" type="submit" />
    </form>
    </div>

    Settings 
    • Replace the url address in green to change the email icon
    • Increase/Decrease the 130 width value for a wider text area
    • Replace http://feedburner.google.com/fb/a/mailverify?uri=helplogger with your Feedburner Email Feed link. You can get it by visiting your feedburner account then navigate to Publicize and then to Email Subscriptions.
    • Replace helplogger with your feed title. It appears at the end of your feed link. In my case it is http://feedburner.google.com/fb/a/mailverify?uri=helplogger

    4. Now Save your widget and check your blog. Enjoy!