Sometimes referred to as a "Fan Page," a Facebook page is a single page where you can share & talk about any particular subject you want: a celebrity, a blog or whatever your heart desires. Think of it as a one-page meeting place, with information, links, a message forum box, RSS and anything else you want.
Want to promote your blog? Then Facebook is one of the best choices when it comes about Social Networking Sites. To see how a Facebook Fan Page looks like, please visit my Facebook Fan Page.
Create a Facebook Fan Page for your blog.
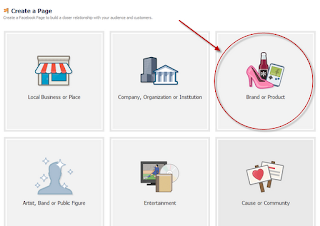
Step 1. Go to the Create Fan Page Link on Facebook and select Brand or Product
Search for "Website" in the drop down list and provide the Page name (e.g., name of your blog) in the next box. Check the "I agree to Facebook Pages Terms" box, then click on the "Get Started" button.
Step 2. You will be transferred to the next page - here you can "Upload an Image" for your Fan Page or Skip to upload it later. Browse for your image clicking on the "Upload from computer" link:
Step 3. Enter your site/blog description and the url address. These informations will appear on your Facebook page. After you have finished, click "Save info".
Step 4. Now you are transferred to your new Facebook Fan Page. To "Manage" your information, click on the "Manage" Button at top right corner of the page.
Get a Shorter Facebook Fan Page URL
Your Fan Page URL will look something like:
http://www.facebook.com/pages/Helplogger/120574614736021
Now, if you have minimum 25 fans, you the possibility to shorten your facebook URL, to look something like this: http://www.facebook.com/helplogger
For this, go to http://www.facebook.com/username/ and click on set a username for your pages.
There you can select the username for your fan page. Be careful when you choose your Facebook Fan Page Username because you can't change it back afterwards.
Use RSS Graffiti Application to share your most recent blog posts
If you want to automatically add your blog posts to Facebook, then use the RSS Graffiti Application.
Steps:
1. go to http://apps.facebook.com/rssgraffiti/ and authorize RSS Graffiti: click on the "Click here to authorize RSS Graffiti" button.
3. authorize RSS Graffiti to access your fan page: click on "Click to authorize" button.
4. Click on the Add Feed Button, and enter your feed url.For example, if your blog is http://yourblog.blogspot.com, then your feed URL will be http://yourblog.blogspot.com/rss.xml
Click the link which says "click here to fetch and preview" and see if its grabbing your blog feed. (if it's not grabbing your feed, then check if you have enabled the blog feeds. If your blog is not hosted on blogger, then your feed url will be different.)
5. After you have added your blog feed, go to the Filter Tab and click on the Change link next to the "Cut-off date/time". Choose the latest posts of your blog from the drop down and click on the Save button.
You don't need to worry if your posts don't appear immediately on your Facebook Fan Page Wall, there might be some delay in the wall getting updated, as RSS Graffiti checks the feed for new entries at regular time intervals.


