Showing posts with label threaded comments. Show all posts

Add a Different Background For Author Comments in Blogger's Threaded Comments

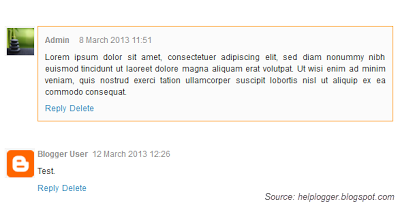
In this tutorial we will learn how to highlight the author comments so that they will have a different background color, border, or anything that makes them stand out from the others. To achieve this, we need to add a code in the Blogger's template and to modify the style according to our preferences.
blogger tricks, blogger comments
  

How to highlight author comments in Blogger:

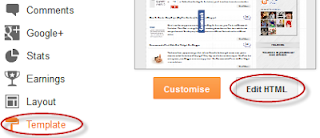
Step 1. Go to Template, click on Edit HTML

blogger threaded comments, customize blogger comments

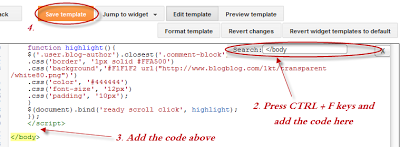
Step 2. Click anywhere inside the code area and try to find - using CTRL + F keys - this tag:
</body>
Screenshot:
blogger comments, blogger tricks

Step 3. Just above it, paste the following code:
<script src='http://code.jquery.com/jquery-latest.js'/>
<script>
$(function() {
function highlight(){
$('.user.blog-author').closest('.comment-block')
.css('border', '1px solid #FFA500')
.css('background','#F1F1F2 url("http://www.blogblog.com/1kt/transparent/white80.png")')
.css('color', '#444444')
.css('font-size', '12px')
.css('padding', '10px');
}
$(document).bind('ready scroll click', highlight);
});
</script>

Customizing the Author Comments:


Border:
The line marked in orange represents the border's style.
What it can be done:
  • 1px - you can increase the value to change the border's thickness
  • solid - change the border's style to dotted, dashed, inset, outset etc.
  • #FFA500 - this is the border's color value, change it with your own color

Background:
The line marked in blue represents the background's style. You can use a plain color or an image. By default there's a combination of both (a white transparent image with a gray plain color).
To change/add:
  • a different color: replace the #F1F1F2 value with your own (use this tool to find the hex code of your desired color)
  • an image: replace the defaul url http://www.blogblog.com/1kt/transparent/white80.png with that of your image

Font Color:
To change the font's color, replace the #444444 color value in green with your own. (you can use this tool to find the hex code of your desired color)

Font Size:
Modify the value in red by increasing/decreasing the "12" value in order to change the size of text.

Step 4. Now Save your Template.

To customize the entire style of threaded comments, please check my previous tutorial on How to Customize Comment's Background, Font Color and Border in Blogger.
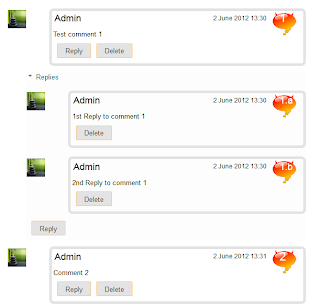
Numbered comments on threaded comments for Blogger/Blogspot

In a past tutorial, I've been talking about how you can add numbered comments to your blogger blog and today we'll learn how we can add numbered comments along with comment bubbles on the threaded comments as well.

What the following CSS trick will do for you:
  1. When the general block of comments is initiating (.comments-content) a counter called countcomments activates and starts with an initial value of 1. 
  2. Then, each time the code flow goes through a review of any level, either a principal or a reply comment (.comment-thread li), content will bring us in front (:before) of the body of the comment, the number that is the counter at the time.
  3. Then is incremented in one unit the counter (counter-increment).
See the screenshot:
count comments, comment bubble, forum, blogger

Isn't that great? Well, i'm pretty sure many of you have been waiting for this cool trick. So let's begin applying it for our threaded comments system.

Steps to add bubble comments count

Step 1: Go to Dashboard - Template - Edit HTML (click on Proceed if needed)

    ...Expand Widget Templates:


    Step 2: Search (CTRL + F) for this piece of code:

    ]]></b:skin>

    Step 3: Add the following code just above it:

    .comment-thread ol {
    counter-reset: countcomments;
    }
    .comment-thread li:before {
    content: counter(countcomments,decimal);
    counter-increment: countcomments;
    float: right;
    z-index: 2;
    position:relative;
    font-size: 22px;
    color: #555555;
    padding-left:10px; 
    padding-top:3px; 
    background: url(
    https://blogger.googleusercontent.com/img/b/R29vZ2xl/AVvXsEgSL6Tn0Q10ghnzwweQES-5FqX-0l5AQH-B4Qa4Rh_ahay_xomhO9Bu4TNfXdWaDvp77EkNHee_nxiSW-alRux6zGBdM3gef5plvMWs1cuxpqZRZf8lWIwQvaCFxvwL5FaD8XsEPeakpXsO/s1600/comment+bubble2.png) no-repeat;
    margin-top:7px; 
    margin-left:10px; 
    width: 50px; /*image-width size*/
    height: 48px; /*image-height size*/ 

    }
    .comment-thread ol ol {
    counter-reset: contrebasse;
    }
    .comment-thread li li:before {
    content: counter(countcomments,decimal) "." counter(contrebasse,lower-latin);
    counter-increment: contrebasse;
    float: right;
    font-size: 18px;
    color: #666666;
    }

    Note:
    • for no bubble icon, remove the code in red (including the blue code)
    • to change the comment bubble, replace the code in blue with the URL address of your own icon. If you're not sure what icon you should use, you can find some cool icons in my previous posts (see these tutorials here and here)
    • to change the position of comments count, increase/decrease the values (3 & 10) from padding-top and padding-left
    • to change the position of comments bubble/icon, change the values (10 & 7) from margin-left and margin-top
    Step 4: Now Save the Template and you're done!

    If you enjoy reading this blog, please share and subscribe. For any questions, leave a comment below.

    How To Remove Blogger Threaded Comments

    The Blogger Threaded commenting system allows a reader to reply to other reader comments on that post. Blogger supports threaded commenting with two levels - the original comment, and the replies to that comment. If you want remove threaded comments from your blogger blog, follow these steps:


    Step 1. Go To Blogger Dashboard > Template > Edit HTML (click on Proceed button if needed)


    Step 2. Select "Expand Widget Templates" (back up your template)


    Step 3. Search (using CTRL + F) for the following code:

    <b:if cond='data:post.showThreadedComments'>
                <b:include data='post' name='threaded_comments'/>
              <b:else/>
                <b:include data='post' name='comments'/>
              </b:if>
            </b:if>
            <b:if cond='data:blog.pageType == &quot;item&quot;'>
              <b:if cond='data:post.showThreadedComments'>
                <b:include data='post' name='threaded_comments'/>
              <b:else/>
                <b:include data='post' name='comments'/>
              </b:if>
            </b:if>

    Step 4. Now remove it (you'll find this code twice and replace it twice) and paste this code instead:

       <b:include data='post' name='comments'/>
              </b:if>
                   <b:if cond='data:blog.pageType == &quot;item&quot;'>
                         <b:include data='post' name='comments'/>
         
            </b:if>

    Step 5. Save Template.

    That was all!