Showing posts with label css. Show all posts

How to Add a Tiny jQuery Circleslider to Blogger

Tiny Circleslider is a small jQuery plugin that generates a circular carousel of images.

There is noting complicated about using this type of carousel, however when it's about customizing it, it's necessary to use a bit of arithmetic. All these details can be found in the author's homepage, so I'll just limit myself to show you the basics.


Obviously, we need to add the javascript jQuery library in our template:

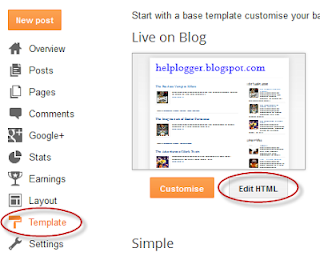
Step 1. From your Blogger's dashboard, go to Template > press the Edit HTML button


Step 2. Search for the </head> (CTRL + F) tag and just above it, add the following code:
<script src='http://ajax.googleapis.com/ajax/libs/jquery/1.10.2/jquery.min.js' type='text/javascript'/>
<script src="http://helplogger.googlecode.com/svn/trunk/jquery.tinycircleslider.min.js"/>
We would lack the CSS styles that we need to add above the </head> tag as well:
<style>
  #rotatescroll { /* is the rectangle container */
    height: 300px;
    position: relative;
    width: 300px;
  }
  #rotatescroll .viewport { /* is the rectangle containing the images */
    height: 300px;
    position: relative;
    margin: 0 auto;
    overflow: hidden;
    width: 300px
  }
  #rotatescroll .overview { /* is the list with the images */
    left: 0;
    list-style: none;
    margin: 0;
    padding: 0;
    position: absolute;
    top: 0;
  }
  #rotatescroll .overview li { /* each item of the list */
    float: left;
    height: 300px;
    position: relative;
    width: 300px;
  }
  #rotatescroll .overlay { /* the image with the circle overlapping the list */
    background: transparent url(https://blogger.googleusercontent.com/img/b/R29vZ2xl/AVvXsEik1uwsEZVrZ_R20WqniFDaPT3Xniv5vOMRDID8SwLjhNL5GOfCGFZYA3IlnKqpGiLNTbGpC7IP92Fel44Tv3WH5e-NJI9IuyY6MJDsfYmTvNtjxqN-bQogb2AHdQ_vk9G6KEIu3MaRHSji/s1600/bg-rotatescroll.png) no-repeat 0 0;
    height: 300px;
    left: 0;
    position: absolute;
    top: 0;
    width:300px;
  }
  #rotatescroll .thumb { /* the red circle that allows us to navigate */
    background:transparent url(https://blogger.googleusercontent.com/img/b/R29vZ2xl/AVvXsEi5CDWBUjpQGo1bg4oZEBmvTH6QFe3pTzx9p00F6h2LJCv5JhGgRlGqbXMSez024XuabbfYl6DEkU0FBx0InQauHPwre0EdfEUeZZqVQDpxAH9y-_SO6MAGINyDDfqSnnpp-uRoxy1U_25h/s1600/bg-thumb.png) no-repeat 0 0;
    cursor: pointer;
    height: 26px;
    left: 137px;
    position: absolute;
    top: -3px;
    width: 26px;
    z-index: 200;
  }
  #rotatescroll .dot { /* the points indicating the position of each image */
    background: transparent url(https://blogger.googleusercontent.com/img/b/R29vZ2xl/AVvXsEhb5_IdHhyljHNTGfax6Wl0rJJ4hR_1J5spJnWmwB6h3LQkYzBX76BYGoZ41juiOqYJ_hqVhYfHAkJsD0LlzPo-jDWAGHEF7isA1w-3Kg-RmGkgIVTyFbb0HZLDxUFOfNiqtS678hDMBsY4/s1600/bg-dot.png) no-repeat 0 0;
    display: none;
    height: 12px;
    left: 155px;
    position: absolute;
    top: 3px;
    width: 12px;
    z-index: 100;
  }
  #rotatescroll .dot span { /* are hidden by default */
    display: none;
  }
</style>
Screenshot
Step 3. Now here's the HTML that has to be added to where we want to display the carousel.
Create a New post and paste on the HTML section, the code below:
<div id="rotatescroll">
  <div class="viewport">
    <ul class="overview">
      <li><img src="imageURL" /></li>
      <li><img src="imageURL" /></li>
      <li><img src="imageURL" /></li>
      <li><img src="imageURL" /></li>
      <li><img src="imageURL" /></li>
    </ul>
  </div>
  <div class="dot"></div>
  <div class="overlay"></div>
  <div class="thumb"></div>
</div>

<script type="text/javascript">
$(document).ready(function(){ $('#rotatescroll').tinycircleslider(); });
$('#rotatescroll').tinycircleslider({ interval: true, snaptodots: true });
</script>
Screenshot

Note: replace the imageURL text with the URL of your images

and here are other options that could be added, separated by commas:

snaptodots - false if you want no dots to be shown when dragging them
hidedots - false if you want to display the internal points (by default is true)
intervaltime - is the time between slides (by default 3500)
radius - defines the size of the circle (by default is 140)

Add Keyboard Keys Effect To Your Text in Blogger with CSS

For many of us the design and the template are the most important, making our readers be more interested and coming back to our blog. In this tutorial, I will show you how to create a keyboard keys effect only with CSS. It is not necessary to add an image, so that your blog will load faster.

how to add keyboard keys with css in blogger

How to Add Keyboard Keys to Blogger


Step 1: From Blogger Dashboard, go to Template > Edit HTML

edit the html of blogger template

Step 2: Look for this line (Ctrl + F)
]]></b:skin>
Screenshot
Click on the arrow to expand the code

Step 3: Just above ]]></b:skin> paste this CSS code:

kbd{
border:1px solid gray;
font-size:1.2em;
box-shadow:1px 0 1px 0 #eee, 0 2px 0 2px #ccc, 0 2px 0 3px #444;
-webkit-border-radius:3px;
-moz-border-radius:3px;
border-radius:3px;
margin:2px 3px;
padding:1px 5px;
}
Step 4: Save the change made.

Now the only thing left to do is adding the tags to the desired text to make it look as it would be inside of the keyboard keys.

For this you need to create a new post, write the text on which you want to apply the style and then switch to HTML - where you have to add before and after it, the following HTML tags:

<kbd>Ctrl</kbd> + <kbd>F</kbd>

Screenshot
text with keyboard key effect

And, it will be visible in your post as:

Ctrl + F

Rounded Corners and Shadows for Images using CSS

Here are some unique border styles that you can apply to blogger images by using the border-radius property and defining either all four corners simultaneously or applying the rounded border only to some of them.

One of the advantages of CSS3 is that we can apply rounded borders without complicating things too much and one of the options would be to use these edges or borders to images in the blog posts, to which we can also add some hover effects such as shading and rounded borders accompanied by transitions.

Note: if you need more info about how to add rounded corners on images, follow these links:
- CSS Basics. How to Apply Rounded Corners On Images #1
- CSS Basics. How to Apply Rounded Corners On Images #2

Below are a few examples of these borders and how the images behave when you hover over them.
If you want to use one of these styles, just copy the code below the image, then go to Template, click on the Edit HTML button and paste that code before ]]></b:skin> (CTRL + F to find it)
.post-body img {
border:0;
padding:0;
-moz-transition: all 1s;
-webkit-transition: all 1s;
-o-transition: all 1s;
}
.post-body img:hover {
box-shadow: 0px 0px 15px #000; /* Shadow */
border-radius: 50%; /* Rounded border */
-moz-transition: all 1s;
-webkit-transition: all 1s;
-o-transition: all 1s;
cursor:pointer;
}
.post-body img {
background:#FFF; /* background color around the image */
padding:15px; /* space between border and image */
-moz-transition: all 1s;
-webkit-transition: all 1s;
-o-transition: all 1s;
}
.post-body img:hover {
box-shadow: 0px 0px 15px #000; /* Shadow */
border-radius: 0% 50%; /* Rounded border */
-moz-transition: all 1s;
-webkit-transition: all 1s;
-o-transition: all 1s;
cursor:pointer;
}
.post-body img {
background:#FFF; /* the background color around the image */
padding:15px; /* The Space Between Border and Image */
border-radius: 50% 0; /* Rounded border */
box-shadow: 0px 0px 15px #000; /* Shadow */
-moz-transition: all 1s;
-webkit-transition: all 1s;
-o-transition: all 1s;
}
.post-body img:hover {
border-radius:0; /* This removes the border roundness (value 0) */
-moz-transition: all 1s;
-webkit-transition: all 1s;
-o-transition: all 1s;
cursor:pointer;
}
.post-body img {
box-shadow: 0px 0px 15px #000; /* Shadow */
border-radius: 50%; /* Rounded border */
border:0;
padding:0;
-moz-transition: all 1s;
-webkit-transition: all 1s;
-o-transition: all 1s;
}
.post-body img:hover {
box-shadow: 0; /* With this we remove the shadow (value 0) */
border-radius: 0; /* This removes the border roundness (value 0) */
-moz-transition: all 1s;
-webkit-transition: all 1s;
-o-transition: all 1s;
cursor:pointer;
}
.post-body img {
border-radius: 45% / 20%; /* Rounded border */
box-shadow: 0px 0px 15px #000; /* Shadow */
padding:0;
-moz-transition: all 1s;
-webkit-transition: all 1s;
-o-transition: all 1s;
}
.post-body img:hover {
border-radius: 0; /* This removes the roundness of border (value 0) */
-moz-transition: all 1s;
-webkit-transition: all 1s;
-o-transition: all 1s;
cursor:pointer;
}
So these effects will apply to all images uploaded to your Blogger posts. But if you want to apply them only on certain pictures then change .post-body img with .rounded  and .post-body img:hover with .rounded:hover
Then add the rounded class selector in the image's code:
<img class="rounded" src="Image URL"/>
These are just some examples, however, you can modify them anytime by adding or deleting more CSS styles, it depends on everybody's tastes or needs. But as you have seen, we can make the images look way more attractive and this has been done only with CSS ;)