Showing posts with label social media. Show all posts

How To Add Social Media Icons to Blogger Header

social media icons, facebook icons, social media icons for bloggerThis tutorial will help you to add social media icons in the top right corner of the page which could increases the likelihood that readers can follow through the various social networks. There are several ways to do this, like adding a new widget section to the blog header but now, we'll do it using an unordered list that uses icons of Facebook, Twitter, Google+ and blog feed, and as a bonus, the icons will rotate when you hover over them.

You can see a demo in this test blog.


Adding Social Media Icons to Blogger Header

Step 1. From your Blogger dashboard, go to Template and click on the Edit HTML button:

blogger blogspot, blogger template, blogger gadgets

Step 2. To expand the style, click on the small arrow on the left of <b:skin>...</b:skin> (screenshot 1), then click anywhere inside the code area to search (using CTRL + F) for the ]]></b:skin> tag (screenshot 2) and add this code just above it:

 /* Social icons for Blogger
----------------------------------------------- */

#social-icons {
margin-bottom:-30px;
height:50px;
width:100%;
display:block;
clear:both;
z-index: 2;
position: relative;
}
.social-media-icons {
display:table
}
.social-media-icons ul {
text-align:right;
padding:5px 5px 0 0
list-style-image:none;
list-style-position:outside;
list-style-type:none;
}
.social-media-icons ul {
margin-bottom:0;
padding:0;
float:right;
}
.social-media-icons li.media_icon {
margin-left:6px;
padding-left:0 !important;
background:none !important;
display:inline;
float:left;
}
.social-media-icons li:hover {
-moz-transform: rotate(360deg);
-webkit-transform: rotate(360deg);
-o-transform: rotate(360deg);
transform: rotate(-360deg);
-moz-transition: all 0.5s ease-in-out;
-webkit-transition: all 0.5s ease-in-out;
-o-transition: all 0.5s ease-in-out;
-ms-transition: all 0.5s ease-in-out;
transition: all 0.5s ease-in-out;
}

Screenshot 1:


Screenshot 2:


Step 3. Now search for this line

<b:section class='header' id='header' maxwidgets='1' showaddelement='no'>

Step 4. And just above it, add this code:

<div class='social-media-icons' id='social-icons'>
<ul>

<li class='media_icon'><a href='http://facebook.com/username'><img border='0' src='https://blogger.googleusercontent.com/img/b/R29vZ2xl/AVvXsEhGBQMll4gcrfxhkO7k7w5qhq9m4hQSBnHa4ogOiy6J1k1kkOWhx6XZBbGWBHZdokPT8VKC9UkMW6Bw9upWzQk50oNZ5wF3R7cWTmG6WRv-Gxjzbm0qnv72obxlT658e3WcijFalqipjjk/s1600/Facebook.png'/></a></li>

<li class='media_icon'><a href='http://twitter.com/#!/username'><img border='0' src='https://blogger.googleusercontent.com/img/b/R29vZ2xl/AVvXsEgkxOQcbCLP3NXd1tHMCqLS1wB-tbTcOs-yZ01oVNDCz9CKNMIoRP8LXOs1mBbNsy1-_KWlBGSmYsuTKzgMpbQWMKLovn-It6eYcuLPQf68BnM8I5IocKKNRWMhpYiIl9HJ8fvTnhyphenhyphenOTQw/s1600/Twitter.png'/></a></li>

<li class='media_icon'><a href='https://plus.google.com/XXXXXXXXXXXXXXXXXX/about'><img border='0' src='https://blogger.googleusercontent.com/img/b/R29vZ2xl/AVvXsEjJ1W8szWRABXcynyfwHKJKyVsj73OVpy1NyOxpfugNuFlpGKWTh_j0MgV-sQ_cx-Y4sLLOeFEuM8fhyphenhyphenaLVHrJd6hpSRGHa_Fg8cvv40CK7riNl-7Q57na20W2Xulm55VW2cBGkXI-NELw/s1600/googleplus.png'/></a></li>

<li class='media_icon'><a href='http://name-of-your-blog.com/feeds/posts/default'><img border='0' src='https://blogger.googleusercontent.com/img/b/R29vZ2xl/AVvXsEhN4uT3GiuGu1-G_ng2NHkVpV14yofvdnvGmFETZvmv7oYZbjrcsuEftiQ7Ed8odFCxsm-bFX_myF4mCxW5nw_PrqWH9ank3YmQIRpqCjh5LCuZapFly2yNTpWH7WUWSRpApkt1wjruSh8/s1600/RSS.png'/></a></li>

</ul></div>

Customization

- Change what's in red with your usernames and id: the first is your Facebook username, the second is that of Twitter, in the third you should change the X by the ID of your Google+ profile and in the fourth you will put the name of your blog.
- To change the icons, just replace the urls in blue with the ones of your images.
- You can add more icons if you want, you just have to add before </ul></div> a line like this for each extra icon you want:

<li class='media_icon'><a href='Link URL'><img border='0' src='Image URL'/></a></li>

Step 5. Finally, Save the Template to apply the changes.

The effect is done with CSS3, so this effect will not work in older browsers.

Add Floating Social Media Sharing Buttons To Blogger

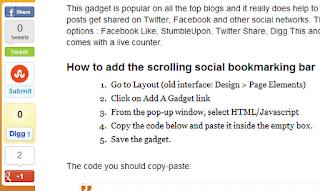
The Floating Social Media Sharing is a very popular widget on all the top blogs, being a very good way to increase the number of times your posts get shared on Twitter, Facebook and other social networks. It has some of the following functions: Facebook Like, StumbleUpon, Twitter Share, Digg This, Google+ and RSS Feed Icon and each of them comes with a live counter. You can add more sharing buttons or social bookmarking icons later if you wish.

Blogger, WordPress, Facebook, Share

How to add the scrolling social bookmarking bar


The code to copy-paste (updated!):

<!-- floating share bar Start helplogger.blogspot.com--> <style type="text/css"> #pageshare {position:fixed; bottom:5%; margin-left:-721px; float:left; border-radius:5px;-moz-border-radius:5px;-webkit-border-radius:5px;background-color:#fff;padding:0 0 2px 0;z-index:10;} #pageshare .sbutton {float:left;clear:both;margin:5px 5px 0 5px;} .fb_share_count_top {width:48px !important;} .fb_share_count_top, .fb_share_count_inner {-moz-border-radius:3px;-webkit-border-radius:3px;} .FBConnectButton_Small, .FBConnectButton_RTL_Small {width:49px !important; -moz-border-radius:3px;/*bs-fsmsb*/-webkit-border-radius:3px;} .FBConnectButton_Small .FBConnectButton_Text {padding:2px 2px 3px !important;-moz-border-radius:3px;-webkit-border-radius:3px;font-size:8px;} </style> <div id='pageshare' title="Get this from Helpblogger.com">
<div style="margin-left:8px;"><div class='sbutton' id='like' style='margin: 5px 0 0 5px;'><script src='http://connect.facebook.net/en_US/all.js#xfbml=1'></script><fb:like layout='box_count' show_faces='false'></fb:like> </div></div>
<br /><div class='sbutton'><a class='twitter-share-button' data-count='vertical' data-via='Helplogger' expr:data-counturl='data:blog.url' href='http://twitter.com/share' rel='nofollow'>Tweet</a><script src='http://platform.twitter.com/widgets.js'; type='text/javascript'></script>
<br /><div class='sbutton' id='su'> <script src="http://www.stumbleupon.com/hostedbadge.php?s=5"></script> </div> <div class='sbutton' id='digg' style='margin-left:3px;width:48px'> <script src='http://widgets.digg.com/buttons.js' type='text/javascript'></script> <a class="DiggThisButton DiggMedium"></a> </div> <div class='sbutton' id='gplusone'> <script type="text/javascript" src="https://apis.google.com/js/plusone.js"></script> <g:plusone size="tall"></g:plusone></div><br/><a href='http://feeds.feedburner.com/helplogger' rel='nofollow' target='_blank' title='Subscribe To Our Rss Feed'><img src='https://blogger.googleusercontent.com/img/b/R29vZ2xl/AVvXsEiXTEabNNvtBcT7Tvif5NTBOU7MdxJOu0EhaRXifyECNKzUyWFNjesx-pGqa5V9ocnSxo3ZCj_tPpjSckWELdPXdwfBqJtJ-YUYQAr35VPLpO3hSnEhm8ck9r3H62jWtZZqJEof7f5S2HFH/s1600/icon_rss_reader.png'/></a><div style="clear: both;font-size: 9px;text-align:center;">Get <a style="color: #3399BB;" href="http://helplogger.blogspot.com/">widget</a></div><!-- Do not remove this link --> </div> <!-- floating share bar End --></div>


Customization:
  • Vertical alignment - Change the value of bottom in code line 3. The code positions the button relative to the bottom of your browser window. To fix the distance even when window is resized, specify the value in px (pixels) instead of %.
  • Horizontal alignment - Change the value in red of margin-left. Negative value pushes the button to the left of the main blog column, positive value pushes it to the right. Increase or decrease the value based on your needs.
  • Twitter setting - Replace Helplogger with your Twitter username
  • Replacing and removing buttons - You can replace existing buttons with your own. Each button is represented by this code: <div class='sbutton'> BUTTON CODE HERE </div>
  • RSS Feed - Change the text in blue with the url address of your RSS feed.
Enjoy :)


Add Static Facebook Pop Out Like Box with Smooth Jquery Hover Effect

In this tutorial i will show you how to add a cool floating Facebook like widget for Blogger that slides to the left on mouseover. Demo: You can see a static facebook badge at the right side of this blog


Adding Static Facebook Like widget on blogger

Just follow the steps:

1. Log in to your Blogger Dashboard, go to Design >> Edit HTML

2. Check the "Expand Widget Templates" box

3. Search (CTRL + F) for this tag:

</head>

4. Add the following code just before/above </head> tag:

<script src="https://ajax.googleapis.com/ajax/libs/jquery/1.7.1/jquery.min.js"></script>

5. Save the Template.

6. Now go to Design >> Page Elements >> Add a new Gadget >> Choose HTML/JavaScript and in the HTML box, paste the code below:

<style type="text/css">
/*<![CDATA[*/
#fbplikebox{display: block;padding: 0;z-index: 99999;position: fixed;}
.fbplbadge {background-color:#3B5998;display: block;height: 150px;top: 50%;margin-top: -75px;position: absolute;left: -47px;width: 47px;background-image: url("https://blogger.googleusercontent.com/img/b/R29vZ2xl/AVvXsEjxpgtmMpYS70rMZjtGDyQ6F-miahl-efEH1o7r97BiX38Yp-pTRkM4O5Y4lx7J8_EAF0-And8ir7J9Yq2lxCFQYZBXQWi187m9vulwTtpt3DBx1KlxLT9rPDUoOpdR6LCIPjG50Yrcarg/s1600/vertical-right.png");background-repeat: no-repeat;overflow: hidden;-webkit-border-top-left-radius: 8px;-webkit-border-bottom-left-radius: 8px;-moz-border-radius-topleft: 8px;-moz-border-radius-bottomleft: 8px;border-top-left-radius: 8px;border-bottom-left-radius: 8px;}
/*]]>*/
</style>
<script type="text/javascript">
/*<![CDATA[*/
    (function(w2b){
        w2b(document).ready(function(){
            var $dur = "medium"; // Duration of Animation
            w2b("#fbplikebox").css({right: -250, "top" : 100 })
            w2b("#fbplikebox").hover(function () {
                w2b(this).stop().animate({
                    right: 0
                }, $dur);
            }, function () {
                w2b(this).stop().animate({
                    right: -250
                }, $dur);
            });
            w2b("#fbplikebox").show();
        });
    })(jQuery);
/*]]>*/
</script>
<div id="fbplikebox" style="display:none;">
    <div class="fbplbadge"></div>
    <iframe src="http://www.facebook.com/plugins/likebox.php?href=YOUR-FACEBOOK-PAGE&amp;width=250&amp;height=250&amp;colorscheme=light&amp;show_faces=true&amp;border_color=%23C4C4C4&amp;stream=false&amp;header=false" scrolling="no" frameborder="0" style="border:none; overflow:hidden; width:250px; height:250px;background:#FFFFFF;" allowtransparency="true"></iframe>
</div>

7. Replace YOUR-FACEBOOK-PAGE text above with the URL of your facebook fan page.
Also replace the : symbol in your URL with %3A and / with %2F

For example, my facebook fan page is:

http://www.facebook.com/pages/Helplogger/120574614736021

After replacing the characters above, your facebook fan page should look like this:
http%3A%2F%2Fwww.facebook.com%2Fpages%2FHelplogger%2F120574614736021

Other settings (optional):
- to change the width and height of the facebook box, change the bolded values (250)
- to change the background color of the facebook fan box, replace #FFFFFF with the hex code of your color (you can choose it from here)
- if you want to change the color of the facebook badge (facebook button) replace this code #3B5998
with your own.

8. Now you can save your widget. Enjoy!

Credit goes to Harish (way2blogging)