Showing posts with label Image Effects. Show all posts

How to Add a Tiny jQuery Circleslider to Blogger

Tiny Circleslider is a small jQuery plugin that generates a circular carousel of images.

There is noting complicated about using this type of carousel, however when it's about customizing it, it's necessary to use a bit of arithmetic. All these details can be found in the author's homepage, so I'll just limit myself to show you the basics.


Obviously, we need to add the javascript jQuery library in our template:

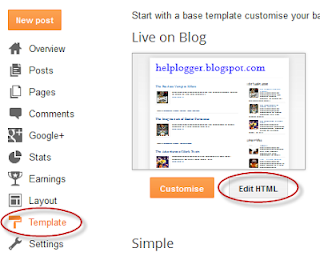
Step 1. From your Blogger's dashboard, go to Template > press the Edit HTML button


Step 2. Search for the </head> (CTRL + F) tag and just above it, add the following code:
<script src='http://ajax.googleapis.com/ajax/libs/jquery/1.10.2/jquery.min.js' type='text/javascript'/>
<script src="http://helplogger.googlecode.com/svn/trunk/jquery.tinycircleslider.min.js"/>
We would lack the CSS styles that we need to add above the </head> tag as well:
<style>
  #rotatescroll { /* is the rectangle container */
    height: 300px;
    position: relative;
    width: 300px;
  }
  #rotatescroll .viewport { /* is the rectangle containing the images */
    height: 300px;
    position: relative;
    margin: 0 auto;
    overflow: hidden;
    width: 300px
  }
  #rotatescroll .overview { /* is the list with the images */
    left: 0;
    list-style: none;
    margin: 0;
    padding: 0;
    position: absolute;
    top: 0;
  }
  #rotatescroll .overview li { /* each item of the list */
    float: left;
    height: 300px;
    position: relative;
    width: 300px;
  }
  #rotatescroll .overlay { /* the image with the circle overlapping the list */
    background: transparent url(https://blogger.googleusercontent.com/img/b/R29vZ2xl/AVvXsEik1uwsEZVrZ_R20WqniFDaPT3Xniv5vOMRDID8SwLjhNL5GOfCGFZYA3IlnKqpGiLNTbGpC7IP92Fel44Tv3WH5e-NJI9IuyY6MJDsfYmTvNtjxqN-bQogb2AHdQ_vk9G6KEIu3MaRHSji/s1600/bg-rotatescroll.png) no-repeat 0 0;
    height: 300px;
    left: 0;
    position: absolute;
    top: 0;
    width:300px;
  }
  #rotatescroll .thumb { /* the red circle that allows us to navigate */
    background:transparent url(https://blogger.googleusercontent.com/img/b/R29vZ2xl/AVvXsEi5CDWBUjpQGo1bg4oZEBmvTH6QFe3pTzx9p00F6h2LJCv5JhGgRlGqbXMSez024XuabbfYl6DEkU0FBx0InQauHPwre0EdfEUeZZqVQDpxAH9y-_SO6MAGINyDDfqSnnpp-uRoxy1U_25h/s1600/bg-thumb.png) no-repeat 0 0;
    cursor: pointer;
    height: 26px;
    left: 137px;
    position: absolute;
    top: -3px;
    width: 26px;
    z-index: 200;
  }
  #rotatescroll .dot { /* the points indicating the position of each image */
    background: transparent url(https://blogger.googleusercontent.com/img/b/R29vZ2xl/AVvXsEhb5_IdHhyljHNTGfax6Wl0rJJ4hR_1J5spJnWmwB6h3LQkYzBX76BYGoZ41juiOqYJ_hqVhYfHAkJsD0LlzPo-jDWAGHEF7isA1w-3Kg-RmGkgIVTyFbb0HZLDxUFOfNiqtS678hDMBsY4/s1600/bg-dot.png) no-repeat 0 0;
    display: none;
    height: 12px;
    left: 155px;
    position: absolute;
    top: 3px;
    width: 12px;
    z-index: 100;
  }
  #rotatescroll .dot span { /* are hidden by default */
    display: none;
  }
</style>
Screenshot
Step 3. Now here's the HTML that has to be added to where we want to display the carousel.
Create a New post and paste on the HTML section, the code below:
<div id="rotatescroll">
  <div class="viewport">
    <ul class="overview">
      <li><img src="imageURL" /></li>
      <li><img src="imageURL" /></li>
      <li><img src="imageURL" /></li>
      <li><img src="imageURL" /></li>
      <li><img src="imageURL" /></li>
    </ul>
  </div>
  <div class="dot"></div>
  <div class="overlay"></div>
  <div class="thumb"></div>
</div>

<script type="text/javascript">
$(document).ready(function(){ $('#rotatescroll').tinycircleslider(); });
$('#rotatescroll').tinycircleslider({ interval: true, snaptodots: true });
</script>
Screenshot

Note: replace the imageURL text with the URL of your images

and here are other options that could be added, separated by commas:

snaptodots - false if you want no dots to be shown when dragging them
hidedots - false if you want to display the internal points (by default is true)
intervaltime - is the time between slides (by default 3500)
radius - defines the size of the circle (by default is 140)

Before/After Photo Effect with jQuery

If you have a design or makeup blog, or if you are using before and after image comparison, this script will surely be very useful for you.

In this tutorial we'll learn how to add the Before/After plugin, a script that works with jQuery and displays two pictures dynamically for comparing them at the same time. By dragging sideways a small bar we can see both images that are being compared.

See this Brittany Murphy pic before and after photoshop:

before
after

Implementing this script is simple, we just need jQuery, the Before/After script, and the two images that we are going to compare.

How to add the Before/After plugin to Blogger


Step 1. Go to Template > Edit HTML and before </head> (CTRL + F to find it) paste the following:
<script src='http://ajax.googleapis.com/ajax/libs/jquery/1.10.2/jquery.min.js' type='text/javascript'/>
<script src='http://http://code.jquery.com/ui/1.10.3/jquery-ui.js' type='text/javascript'/>
<script src='http://helplogger.googlecode.com/svn/trunk/jquery.beforeafter.min.js' type='text/javascript'/>
<script type='text/javascript'>
$(function(){
$(&#39;#beforeafter1&#39;).beforeAfter({showFullLinks : true});
});
</script>
Step 2. Click on the Save template button
Note: if the above script doesn't work for you, add it above the </body> tag. Also please verify if you have added jQuery in your template (if you did so, then remove the line in green)

Step 3. Go to Layout, add a HTML/Javascript gadget and paste this code inside the empty box:
<div id='beforeafter1'>
<div><img alt='before' src='URL of the first image' width='500' height='291'/></div>
<div><img alt='after' src='URL of the second image' width='500' height='291'/></div>
</div>
Add the URL of the first image that is the Before image, and the URL of the second image that is the After image.

It is important that you have specified the width and height of each picture so that they work on all browsers.
If you want to add more images just change the ID of the container, in this case the container is called beforeafter1 so you need to change it to beforeafter2 and so on, although you can choose any name as long as all are different.

And in the first code to paste, add another line like this one in blue:
<script src='http://ajax.googleapis.com/ajax/libs/jquery/1.10.2/jquery.min.js' type='text/javascript'/>
<script src='http://http://code.jquery.com/ui/1.10.3/jquery-ui.js' type='text/javascript'/>
<script src='http://helplogger.googlecode.com/svn/trunk/jquery.beforeafter.min.js' type='text/javascript'/>
<script type='text/javascript'>
$(function(){
$(&#39;#beforeafter1&#39;).beforeAfter({showFullLinks : true});
$(&#39;#beforeafter2&#39;).beforeAfter({showFullLinks : true});
});
</script>
You can add as many before/after images as you like as long as all containers have a different ID and the corresponding lines are added in the script.
Below each photo container are the "Show only Before" and "Show only after" links that when you click on them, the complete pictures will be shown. If you want to hide these links, then just change true to false in the first code and they will not be displayed anymore.

Note: if you see white space around the drag icons, then search for this code in your template:
   <Group description="Images" selector=".main-inner">
     <Variable name="image.background.color" description="Background Color" type="color" default="#ffffff" value="#ffffff"/>
... and change the #ffffff value in red to transparent.

Autor: Catch my fame

Spacegallery: image gallery/slideshow made with jQuery

There are many types of galleries for images that we find on the net, but we rarely see one showing images so differently like this one.
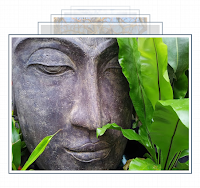
image gallery with jQuery for blogger

Those using Mac OS X will surely find a lot of similarity with TimeMachine and those who don't, I'm sure will enjoy this type of effect for viewing images.

I'm talking about Spacegallery, an image gallery done with jQuery in which images are being displayed one after another when you click on them. You can see in the example below.


To use this gallery follow the steps below:

Step 1. Log in to your Blogger Dashboard, click on your blog and then go to Template and click on the Edit HTML button.

Step 2. Search using CTRL + F keys for the </head> tag and before it paste the following:
<script src='http://ajax.googleapis.com/ajax/libs/jquery/1.10.2/jquery.min.js' type='text/javascript'/>
<script src='http://helplogger.googlecode.com/svn/trunk/SpaceGallery/eye.js' type='text/javascript'/>
<script src='http://helplogger.googlecode.com/svn/trunk/SpaceGallery/utils.js' type='text/javascript'/>
<script src='http://helplogger.googlecode.com/svn/trunk/SpaceGallery/spacegallery.js' type='text/javascript'/>

<script type='text/javascript'>
//<![CDATA[
(function($){
var initLayout = function() {
var hash = window.location.hash.replace('#', '');
var currentTab = $('ul.navigationTabs a')
.bind('click', showTab)
.filter('a[rel=' + hash + ']');
if (currentTab.size() == 0) {
currentTab = $('ul.navigationTabs a:first');
}
showTab.apply(currentTab.get(0));
$('#myGallery').spacegallery({loadingClass: 'loading'});
};

var showTab = function(e) {
var tabIndex = $('ul.navigationTabs a')
.removeClass('active')
.index(this);
$(this)
.addClass('active')
.blur();
$('div.tab')
.hide()
.eq(tabIndex)
.show();
};

EYE.register(initLayout, 'init');
})(jQuery)
//]]>
</script>
Screenshot
Note: if you have already added jQuery in your template, then delete the line in red.

Step 3. Search for ]]></b:skin> (CTRL + F) and when you found it, click on the arrow next to it:


Paste just above ]]></b:skin> the following CSS style:
#myGallery {
width: 100%;
height: 400px;
}
#myGallery img {
border: 2px solid #52697E;
}
a.loading {
background: url(https://blogger.googleusercontent.com/img/b/R29vZ2xl/AVvXsEjb9v3SfAlj7LZo4yNm8VapVXP_9Tr52o1l8XWCM4kfpo2mxPvAmKdn1a6s1DkAkJ061-IDUt2k35uBbitYIAl30yp8sMAKmHf3gWmgJAdIizozl3iQYHM4hJfC2ooUvCEJjb5vY_3hGvXC/s1600/ajax_small.gif) no-repeat center;
}
.spacegallery {
position: relative;
overflow: hidden;
}
.spacegallery img {
position: absolute;
left: 50%;
}
.spacegallery a {
position: absolute;
z-index: 1000;
display: block;
top: 0;
left: 0;
width: 100%;
height: 100%;
}

Step 4. Click on the Save template button

Step 5. Finally go to Layout > Add a Gadget > HTML/Javascript and copy-paste the code below:
<div class="spacegallery" id="myGallery">
<img src="Image URL"/>
</div>
Note: In case you want to add this slideshow inside a post, then create a new post and paste the code in the HTML section

Replace the Image URL text with the URLs of the images of your gallery, keeping in mind that the last image is the first to be displayed.

And so you can enjoy this simple image gallery on your blog, and although it has no display options or settings, is without a doubt a gallery that will draw the attention of your readers.