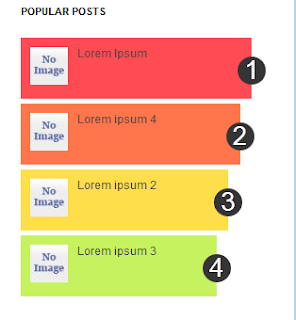
To customize this popular posts widget, we have to add a new variable and some CSS codes to our blogger template. So let's begin:
How to add multi-colored popular posts to Blogger
Step 1. Login to your Blogger Dashboard, go to Design >> Edit HTML
Step 2. Select "Expand Widget Templates" (make a backup first)
Step 3. Search for the following tag:
/* Variable definitions
====================
Note: If you can't find it, paste it below the autor information that is usually below this tag (CTRL + F):
<b:skin><![CDATA[/*
...and should end up with this symbol:
----------------------------------------------- */
Step 4. Copy and paste just below/after this tag, the next code:
<Group description="PopularPosts Backgrounds" selector="#PopularPosts1">
<Variable name="PopularPosts.background.color1" description="background color1" type="color" default="#fa4242" value="#ff4c54"/>
<Variable name="PopularPosts.background.color2" description="background color2" type="color" default="#ee6107" value="#ff764c"/>
<Variable name="PopularPosts.background.color3" description="background color3" type="color" default="#f0f" value="#ffde4c"/>
<Variable name="PopularPosts.background.color4" description="background color4" type="color" default="#ff0" value="#c7f25f"/>
<Variable name="PopularPosts.background.color5" description="background color5" type="color" default="#0ff" value="#33c9f7"/>
</Group>
Step 5. Search for the following piece of code:
]]></b:skin>
Step 6. Just above/before it, add this code:
#PopularPosts1 ul{margin:0;padding:5px 0;list-style-type:none}
#PopularPosts1 ul li{position:relative;margin:5px 0;border:0;padding:10px}
#PopularPosts1 ul li:first-child{background:$(PopularPosts.background.color1);width:90%}
#PopularPosts1 ul li:first-child:after{content:"1"}
#PopularPosts1 ul li:first-child + li{background:$(PopularPosts.background.color2);width:85%}
#PopularPosts1 ul li:first-child + li:after{content:"2"}
#PopularPosts1 ul li:first-child + li + li{background:$(PopularPosts.background.color3);width:80%}
#PopularPosts1 ul li:first-child + li + li:after{content:"3"}
#PopularPosts1 ul li:first-child + li + li + li{background:$(PopularPosts.background.color4);width:75%}
#PopularPosts1 ul li:first-child + li + li + li:after{content:"4"}
#PopularPosts1 ul li:first-child + li + li + li + li{background:$(PopularPosts.background.color5);width:70%}
#PopularPosts1 ul li:first-child + li + li + li + li:after{content:"5"}
#PopularPosts1 ul li:first-child:after,#PopularPosts1 ul li:first-child + li:after,#PopularPosts1 ul li:first-child + li + li:after,#PopularPosts1 ul li:first-child + li + li + li:after,#PopularPosts1 ul li:first-child + li + li + li + li:after{position:absolute;top:20px;right:-15px;border-radius:50%;background:#353535;width:30px;height:30px;line-height:1em;text-align:center;font-size:28px;color:#fff}
#PopularPosts1 ul li .item-thumbnail{float:left;border:0;margin-right:10px;background:transparent;padding:0;width:40px;height:40px}
#PopularPosts1 ul li a{font-size:12px;color:#444;text-decoration:none}
#PopularPosts1 ul li a:hover{color:#222;text-decoration:none}
Step 7. Now find the following code:
<b:widget id='PopularPosts1' locked='false' title='Popular Posts' type='PopularPosts'>
Step 8. Delete it until you reach at this tag (delete the </b:widget> also):
</b:widget>
Note: Be very careful when removing it. The entire fragment of code should look like this:
<b:widget id='PopularPosts1' locked='false' title='Popular Posts' type='PopularPosts'>
<b:includable id='main'>
<b:if cond='data:title'><h2><data:title/></h2></b:if>
<div class='widget-content popular-posts'>
<ul>
<b:loop values='data:posts' var='post'>
<li>
<b:if cond='data:showThumbnails == "false"'>
<b:if cond='data:showSnippets == "false"'>
<!-- (1) No snippet/thumbnail -->
<a expr:href='data:post.href'><data:post.title/></a>
<b:else/>
<!-- (2) Show only snippets -->
<div class='item-title'><a expr:href='data:post.href'><data:post.title/></a></div>
<div class='item-snippet'><data:post.snippet/></div>
</b:if>
<b:else/>
<b:if cond='data:showSnippets == "false"'>
<!-- (3) Show only thumbnails -->
<div class='item-thumbnail-only'>
<b:if cond='data:post.thumbnail'>
<div class='item-thumbnail'>
<a expr:href='data:post.href' target='_blank'>
<img alt='' border='0' expr:height='data:thumbnailSize' expr:src='data:post.thumbnail' expr:width='data:thumbnailSize'/>
</a>
</div>
</b:if>
<div class='item-title'><a expr:href='data:post.href'><data:post.title/></a></div>
</div>
<div style='clear: both;'/>
<b:else/>
<!-- (4) Show snippets and thumbnails -->
<div class='item-content'>
<b:if cond='data:post.thumbnail'>
<div class='item-thumbnail'>
<a expr:href='data:post.href' target='_blank'>
<img alt='' border='0' expr:height='data:thumbnailSize' expr:src='data:post.thumbnail' expr:width='data:thumbnailSize'/>
</a>
</div>
</b:if>
<div class='item-title'><a expr:href='data:post.href'><data:post.title/></a></div>
<div class='item-snippet'><data:post.snippet/></div>
</div>
<div style='clear: both;'/>
</b:if>
</b:if>
</li>
</b:loop>
</ul>
<b:include name='quickedit'/>
</div>
</b:includable>
</b:widget>
Step 9. After you have deleted the above code, paste the following in its place:
<b:widget id='PopularPosts1' locked='false' title='Popular Posts' type='PopularPosts'>
<b:includable id='main'>
<b:if cond='data:title'>
<h2><data:title/></h2>
</b:if>
<div class='widget-content popular-posts'>
<ul>
<b:loop values='data:posts' var='post'>
<li>
<b:if cond='data:showThumbnails == "false"'>
<b:if cond='data:showSnippets == "false"'>
<a expr:href='data:post.href' expr:title='data:post.title' rel='bookmark'><data:post.title/></a>
<b:else/>
<a expr:href='data:post.href' expr:title='data:post.snippet' rel='bookmark'><data:post.title/></a>
</b:if>
<b:else/>
<b:if cond='data:showSnippets == "false"'>
<b:if cond='data:post.thumbnail'>
<img class='item-thumbnail' expr:alt='data:post.title' expr:src='data:post.thumbnail'/>
<b:else/>
<img alt='no image' class='item-thumbnail' src='https://blogger.googleusercontent.com/img/b/R29vZ2xl/AVvXsEh0JbdARo1FBwiAcR3-ACp_SDSM5MU21w2mA6ivvtH-Gd6hjHRoafhtG2vt3xpS-QddDDzpoZ6tvG95Jla4no-ELeoNCfvQdJpnryesm8WUKNxLe0V6RggBPmlRkI-KN6vhbUK0JPvrNks/s1600/default.jpg'/>
</b:if>
<a expr:href='data:post.href' expr:title='data:post.title' rel='bookmark'><data:post.title/></a>
<div class='clear'/>
<b:else/>
<b:if cond='data:post.thumbnail'>
<img class='item-thumbnail' expr:alt='data:post.title' expr:src='data:post.thumbnail'/>
<b:else/>
<img alt='no image' class='item-thumbnail' src='https://blogger.googleusercontent.com/img/b/R29vZ2xl/AVvXsEh0JbdARo1FBwiAcR3-ACp_SDSM5MU21w2mA6ivvtH-Gd6hjHRoafhtG2vt3xpS-QddDDzpoZ6tvG95Jla4no-ELeoNCfvQdJpnryesm8WUKNxLe0V6RggBPmlRkI-KN6vhbUK0JPvrNks/s1600/default.jpg'/>
</b:if>
<a expr:href='data:post.href' expr:title='data:post.snippet' rel='bookmark'><data:post.title/></a>
<div class='clear'/>
</b:if>
</b:if>
</li>
</b:loop>
</ul>
</div>
</b:includable>
</b:widget>
Step 10. Save template.
Settings
- Go back to Layout and click on the edit link of Popular Posts widget.
Select to "display up to 5 posts", then Save the widget.
- You can easily change the background color of the popular posts widget, going to Template >> Customize >> Advanced >> PopularPostsBackground and there you can select any color you want.
You're done!
If you are enjoying reading this blog, please like & subscribe for more tutorials.
For any questions or suggestions, leave a comment below.


