New mobile templates for reading on the go

Posted by Jiho Han, Software Engineer

We know many of you like to view blog posts on your smartphones. However, it can be difficult at times because of the small screen size. This is why we are excited to announce our first launch of mobile templates! Initially available as opt-in functionality on Blogger in Draft, mobile templates will re-format your blogs for smartphones to enhance your readers’ viewing experience. In order to activate mobile templates, simply go to Dashboard > Settings > Email & Mobile tab, enable the mobile template option and then save settings.


Feature highlights
  • Preview: Get a glimpse of what your blog will look like by clicking on the Mobile Preview button. You can also see it on your smartphone by scanning the QR-code to the right of the options.
  • Automatic redirection: All opted-in blogs will automatically be redirected to the mobile view when accessed from a smartphone*.
  • Template support: We are initially supporting 6 variants of the Simple template and 6 variants of the Awesome template. If you have used one of these 12 templates through our Template Designer, your mobile view will be rendered in the same style as your desktop view (other template variants will be rendered as Simple). Some gadgets are also supported**.


  • Mobile ads: Mobile AdSense ads will be displayed at the top of the post pages and at the bottom of the index page if the blog has an AdSense gadget or inline blog ads.

  • Comments and videos: You will be able to make comments and watch videos.
We hope you enjoy the improved mobile experience. As always, we would love to hear from you so please feel free to tell us what you think through our feedback form.

*WebKit-based mobile browsers are supported for our initial launch.
**Supported gadgets/elements in this launch: Header, Blog, Profile, AdSense, Attribution.

Search and Insert YouTube Videos

Blogger supports drop-dead easy video-blogging -- if you have a video file, you can just upload it to Blogger. But when it comes to video-blogging, we know a lot of you also choose to embed YouTube videos to your post.

Currently, adding a YouTube video to your post is fairly easy, but it still requires several steps of work: If you don't have the embed code already, you'd have to open a new browser window or tab, go to YouTube.com, search the video, and play the video to make sure it's the right video. Once you copy the embed code, you come back to your Blogger post and manually insert the code in your post.

We’ve just added a new Blogger in Draft feature that makes this process a lot easier. You don't have to open another tab or window; from your post editor, just click the Insert a Video button in the toolbar. In addition to the already existing Upload tab, you'll now see two new tabs: From YouTube and My YouTube videos.


In the From YouTube tab, you can search, browse, and play back YouTube videos all within the interface. If you have your own videos on YouTube, My YouTube videos tab will show them as well.


Once you choose the video, click on Select to insert the video to the post. You’ll then see a thumbnail image for the video, which you can move around in the post by drag-and-drop.


By the way, in case you didn’t know, it’s as easy to add a video to your blog from YouTube as it is to add a YouTube video in Blogger. While you are watching a YouTube video, click “Share” button, and you will see Blogger as one of the places you can share the video to. Click on Blogger, and you’ll see the familiar BlogThis! mini post editor -- all you have to do is to select a blog (if you have more than one blog, that is), fill out some content, and then Publish the post. Enjoy video-blogging!


More Fonts Means More Choice

Posted by Wongoo Lee, Software Engineer

Self expression is a beautiful thing.  It’s one of the best things about having a bloga place where you can control the look and feel of your message and how it’s presented.  Today we’re excited to announce another amazing way to make your blog truly youWeb Fonts.

The Web has traditionally been pretty limited when it comes to font selection, especially for non-Latin alphabets such as Cyrillic and Greek.  But great strides have been made in this arena by our friends on the Google Web Fonts team, and finally there are more choices out there than just Arial and Times New Roman.  In fact, there are now 40 new fonts on Blogger in Draft for you to choose from.  And we’re just getting startedlots more to come!


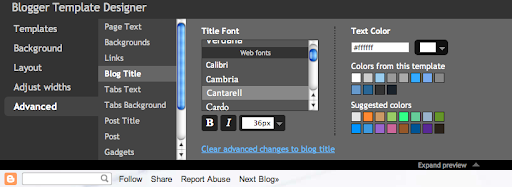
Simply go into the Advanced tab of the Blogger Template Designer, select the type of text you’d like to change (Post Title, Page Text, etc.) and pick from a number of exciting, new fonts such as Reenie Beanie (which we've used for the title of this post!) or Neucha (Cyrillic) or GFS Didot (Greek) or even Hanuman (Khmer).  You will be spoilt with choice! For the full list, please take a look at the Web Fonts page in our Help Center.

Give it a try, and as always, we’d love to hear your feedback.  Just leave us a comment.

New Stats Gadgets

Posted by Wiktor Gworek, Software Engineer

Update, 9/29: 
Based upon your feedback, we've added two gadget options:

  1. In the Popular Post gadget, you can now choose the number of posts you want the gadget to display
  2. In the Blog's Stats gadget, we've added an option to let you choose the time window of your pageview counts (All Time, Last 30 days, Last 7 days)
---
After we launched the Blogger Stats to Blogger in Draft, we’ve made some improvements based on your feedback. (See the updates on our original blog post for the list of changes.) Additionally, we’ve created two new gadgets that you can add to your blog to show your readers interesting stats from your blog: Blog’s stats and Popular Posts gadgets.

The data for these gadgets is automatically taken from Blogger Stats. To use them, go to Design | Page Elements, and click on “Add a gadget.”


The Blog’s stats gadget displays total pageviews* of your blog. The gadget comes in different styles and also features an optional sparkline graph.
(* The pageviews are counted from when we rolled out the Stats feature, not from the first day your blog was created.)


The Popular Posts gadget helps your readers quickly find out which of your posts have been viewed the most by your readers. The gadget also comes with several different styles and configurations.


The new Stats gadgets are available now on Blogger in Draft, so you can go ahead and give them a try now. For any bugs, questions, or suggestions, please send them our way through the comments to this post or our Blogger Help forum.

Use Your Own Photo for Your Blog’s Background

By Wongoo Lee, Software Engineer

After we launched the Blogger Template Designer, one of the most requested features was the ability to upload your own background image. Though we provide hundreds of professional stock photos from iStockPhoto, we know many of you are serious photo buffs and would like to use your own beautiful photo as your blog’s background image.

And now you can! Go to Design | Template Designer | Background, click on Background Image, and you’ll notice a new “Upload image” option, which will allow you to select and upload your image.


For images that fill the entire background, we recommend using a resolution of 1800 pixels wide and 1600 pixels high, and file size less than 200KB to minimize the loading time of your blog pages. We support JPEG, GIF, and PNG format images.

After uploading a photo, you will see additional options that are not available for the built-in images: Alignment, Repeat, and Scroll options.


  • Alignment: You can adjust horizontal (left, center, right) and vertical (top and bottom) alignment of your background image.
  • Repeat (Tile): If you have a small image, you can have it repeat horizontally and/or vertically to fill the page. Otherwise, we recommend that you choose a page background color that blends in with your background image.
  • Scroll: By default, your image stays in place while readers scroll the page contents. By selecting the “Scroll with page” option, both the background image and page contents scroll together. We recommend that you use an image that blends into your background color or set your image to tile vertically if you choose this option.

This feature is available on Blogger in Draft right now, so please go ahead and check it out! As always, thanks for using Blogger in Draft. We will welcome your comments, and if you have any questions, please send them our way through the Blogger Help forum.

Introducing Blogger Stats

Posted by Staszek Paśko and Wiktor Gworek, Software Engineers

(Update 08/30: We’ve made these improvements to the Blogger Stats, based on your feedback and suggestions.)
  • Self-view exclusion: You can now exclude your own visits by clicking on “Don’t track your own pageviews” link on the Stats | Overview page. We’re also now excluding traffic coming from Blogger admin admin pages and post Preview, providing more accurate pageview data.
  • More effective bot traffic filtering. We’ve made several improvements to detect “bots” (the non-human visitors, such as crawlers) including extending our list of known “bots” to provide more accurate pageviews from real visitors.
  • Internationalization. Now Blogger Stats is available in more than 40 languages.
---

Although some of you use Google Analytics or other third party tools to track your blog traffic, many of you have requested an easier-to-use, fully-integrated stats feature for Blogger. We heard that, and we are excited to announce that Blogger in Draft now has built-in stats. Just go to Blogger in Draft, and you'll notice a new "Stats" tab. You don't have to install or configure anything to start benefitting from Stats.

The coolest thing about the new Blogger Stats is that it monitors and analyzes your visitor traffic in near-real-time. You can see which posts are getting the most visits and which sites are sending traffic to your blog right now. For example, if a reader shares one of your blog posts on Twitter and the post is getting lots of clicks, you will see a traffic increase in Blogger Stats almost instantly, with the particular Tweet mentioning your post being identified as the traffic source. Of course, traffic data across longer time periods (day/week/month) and all-time historical data are available as well.


There's also a lot more data that's being tracked, such as popular search keywords that send visitors to your blog, which country your visitors come from, and which web browsers they are using. Basically, with the new Stats feature, you know what's going on with your blog right now.

The new Stats feature shows all of this data in a simple, easy-to-understand graphical user interface. Since Stats are part of Blogger, you don't have to sign up for another service, or embed any code in a gadget.

Additionally, if you want the enterprise-level power and flexibility of Google Analytics, you can still use it, as outlined in this Help Center article. Note that the pageview data in Blogger Stats and in Google Analytics may not be identical, due to different collection mechanisms used. Also, Blogger Stats do not support private blogs for now.

Check out the new Stats feature now, and let us know what you think.

Better Post Preview

Posted by Jaesun Park, Software Engineer

Many of us preview our posts multiple times before we are satisfied with them for public viewing. Blogger in Draft now supports a new, improved preview feature that allows you to see how your post will actually look to your readers.

On the New Post page, click on the Preview button (this is a new button that we’ve just added), and you will see a new window open with the WYSIWYG preview of the post. This is how your blog post will appear to your readers when you hit publish, with the same format and style of your current Blogger theme.


Please note that the preview page does not automatically update as the contents of the post changes. To make sure the post looks OK after you've done further editing, you can refresh the preview page manually, or click the Preview button again.

Panoramio Widgets let you add photos from around the world to your blog

Posted by Roger Trias i Sanz, Panoramio Software Engineer

Today the Panoramio team launches the Panoramio Widget API, an easy way to publish photos of your favorite places right on your blog. Panoramio is a collection of user-submitted images from around the world. With the Panoramio Widget, you can share photos of places visited in your far-off travels, or of your favorite local haunts.


To add Panoramio to your blog, you’ll need to add a bit of HTML. We always recommend adding HTML via the HTML/Javascript gadget (Layout > Page Elements > Add Gadget > HTML/JavaScript), or if you want images in individual posts we recommend using the Post Editor’s Edit HTML tab (Posting > New Post > Edit HTML). (Note: we do not recommend editing the full HTML of your blog since it prevents us from updating your blog with cool new features.)

For example, the images gallery above was created by adding the following snippet of HTML to our blog post:

<iframe src="http://www.panoramio.com/wapi/template/slideshow.html?tag=sanfrancisco&width=450&height=400&delay=6.5" frameborder="0" width="450" height="400" scrolling="no" marginwidth="0" marginheight="0"> </iframe>

Learn more about widget customizations and get the HTML by reading the Panoramio Widget API documentation. And we love feedback! Tell us how we can improve the widget by commenting in our forum, and happy blogging!

Template Designer: Color theme matching, faster in IE, variable-width support

A few quick pieces of news about the template designer and the new templates:
  • Choosing a new background image will shift the main color theme to try to match it. You can of course tweak the color theme or specific colors afterward, but this offers a nice starting place. Works best on the Simple and Picture Window variants that have a background color in their headers.
  • We’ve temporarily disabled the “retrofit” code that adds rounded corners and drop shadows on Internet Explorer. Its current implementation was causing some pretty dramatic freezes on many blogs. We’ll be bringing it back once we’re confident that its performance is acceptable, but in the meantime IE7 and 8 viewers will see unshadowed, square-cornered boxes. Nevertheless, if your IE-using readers were complaining about crashing and freezing on the new templates, those problems should now be gone.
  • There’s no user interface for it, but the templates now have support for variable widths, which you can trigger by playing in Add CSS. Here’s some sample code to get started:
For Simple and Picture Window (except for Simple’s last variant):

body {
padding-left: 50px;
padding-right: 50px;
}

html body .content-outer {
max-width: 1600px;
}

For Awesome Inc., Watermark, and Simple’s last variant:

html body .region-inner {
padding-left: 50px;
padding-right: 50px;
max-width: 1600px;
}

These keep the minimum width at whatever you set in Adjust width but let the blog content grow to a maximum of 1600px wide, leaving 50px or so on the sides to keep from bumping up against the edges of the window. Bear in mind that many of your readers may have small screens, especially laptops, so make sure that your blog still looks nice even when the window is in the 1000–1100px range.

PSA about Edit HTML: If you’ve changed things in Layout > Edit HTML then this might not work, since your HTML template will be based on our stock version at the time you made the edits, and will not have picked up some of the recent additions. In this particular case, you can replace your template’s <b:template-skin> section with that of a fresh blog. That being said, I strongly encourage you to not use Edit HTML unless you reeeeeaaaaalllllyyyyy need it because it does prevent your blog from getting improvements that we make to the default versions.

If you need to add a snippet of HTML or JavaScript to your blog, prefer using an HTML/JavaScript gadget over Edit HTML. If you find instructions that say “add this right before </body>,” just put the gadget at the bottom of your footer. It’s typically close enough. (Please pass this note along if you see any tutorials that recommend using Edit HTML when an HTML/JavaScript gadget will suffice.)

Finally, for those of you reading on an iPad, we’ve added a default viewport width of 1100px that will better-contain most blogs, giving a slightly nicer presentation.


Seeing any issues with the new templates? Leave a comment.

Small Template Designer Tweaks: Two More Variants and Bug Fixes

Last week we updated the Blogger Template Designer with two new variants for Simple, some minor tweaks, and bug fixes. Here’s what you can expect:
  • Simple gains two more variants, one that’s, well, bookish, with serif text and an image background, and another with a full-width background image behind the header and tab regions. Try them out, let us know how they work for you.
  • Links from the background image picker directly to iStockphoto so you can browse an artist’s entire portfolio and see if they have other images you’d like to purchase and use.
  • Bug fixes with in the template designer, including showing the correct background color in the background image picker, showing fonts better in IE, and behavior improvements on the “Templates” tab.
  • Bug fixes in the templates, such as showing deleted comments in italics, fixing the readability of the Search Box gadget’s results, and repositioning Simple’s tab bar to fit better when using a custom header image.
  • A number of stability improvements to our Internet Explorer compatibility code, which should prevent missing embedded videos, cut off backgrounds, and other odd behaviors when rounded corners and drop shadows are rendered in IE.
While the template designer and new templates are still on Blogger in Draft we’re able to change them more easily, so if you find something that isn’t looking right on your blog let us know so we can fix it sooner rather than later. Just leave a note in the comments.

Better Photo Uploading

We recently updated the photo uploading interface in Blogger in Draft’s post editor with a few new features:
  • Multiple photo upload. If you have Flash installed, you can select multiple photos at a time in the file picker, and all of them will get uploaded at once.
  • Picasa Web Albums integration. You can now select from any of the images in your Picasa Web photo albums and insert them into your posts.
Tips from the Blogger Team:
  • You can upload multiple images at once, but then only insert them into your post one-at-a-time. When you re-open the image picker the photos you uploaded before will still be there. This gives you the most control over where your images go, while still keeping the upload process convenient.
  • Take advantage of the Picasa Web Albums integration. If you use Picasa to manage your photos on your computer, you can automatically sync your photos to Picasa Web Albums and then pick them right from the post editor. Not using Picasa? You should try it! It’s a free download for Windows, Mac, or Linux. (iPhoto users: Try the free Picasa Web Albums Uploader that works with directly with iPhoto.)
  • Your uploaded photos will still be there even if you close and re-open the post editor. With the old uploader, images only stuck around in the picker for your current editing session. Now you can upload everything when you start writing your post without worrying about losing any work.
  • Caption your images. We recently added captions to the post editor on Blogger in draft. While this isn’t directly related to the new uploader, it’s a nifty feature that you should try out if you haven’t yet. Find out more
A note on the Picasa Web Albums integration: 


We’ve actually been storing and serving your blog’s images from Picasa Web Albums for a few years, but we haven’t taken full advantage of that integration until now. You may see photos that you uploaded in the past but you never ended up using in a post, but don’t let that alarm you: Blogger always uploads images to an Unlisted photo album. That means that unless you log in to Picasa Web Albums directly and share the photos, the only place they’d ever be seen by anybody is on your blog. Learn more about Picasa Web Albums’ privacy settings

If you do want to clear out those unused images, you can log in to Picasa Web Albums and delete them, but be careful: deleting photos from Picasa Web Albums will remove them from your blog if they’ve been used in a post. So if you’re going to delete, only delete what you’re sure never got posted.

Let us know what you think!


We apologize for the bit of a rocky release this feature had last week, and we’re still tidying up some remaining problems. (We’ve heard reports of the uploader not working in Safari, which our engineers are looking into.) If the photo uploader is not working for you, please let us know in the comments what browser, operating system, and version of Flash (if any) you’re using. Then, if you need to upload photos, use the editor on www.blogger.com. (You can switch to “Updated editor” in Settings > Basic and get most of the features from Blogger in draft, but the older photo uploader.)

It wouldn't be Blogger in Draft if we weren’t trying out new things and listening to your reactions, so please give it a try and tell us what you think.

The Blogger Template Designer

We’ve added a fair bit to Blogger over the years, but one thing that’s been constant for some time has been our collection of templates. While a number of talented designers around the web have offered their own fresh and interesting designs that you can apply to your Blogger blog, our stock set has grown a bit stale, and you’ve noticed. You let us know — in the forums, on Twitter, sitting next to us on airplanes, even from across the counter at a Harvard Square stationary store, and we’ve been listening.

Today we’re taking a big first step in improving not just our template designs, but all the ways that you can customize the look and layout of your blog. We even made a video with jaunty music to show it off:


Here’s what we’re launching today to Blogger in Draft:
  • 15 new, highly-customizable templates from our design team, split into four families: Simple, Picture Window, Awesome Inc, and Watermark
  • One-, two-, and three-column layouts for each template, with complete control over the size and arrangement of the columns
  • Hundreds of background images and patterns from iStockphoto, the leading microstock image marketplace


Try it Now

Go to http://draft.blogger.com/ to log in to Blogger in Draft. (If you’ve never been there before, Blogger in Draft is just like regular Blogger, except with new, in-development features like this one.) Click on your blog’s “Layout” link to go to the Layout tab. The link to the Template Designer is at the end of the row of sub-tabs.


You can use the live preview to see your new template without affecting your blog. When you find a new look that you’re happy with, just click the “Apply to Blog” button to publish it to the world. Note: You can backup your existing template ahead of time by going to Layout > Edit HTML. We recommend this if you have a customized blog design that you might want to go back to.

Classic template blogs: If you have a “Template” link or tab instead of “Layout,” you’ll first need to switch from Classic to Layouts before you can try out the Template Designer. Go to Classic > Customize Design and follow the instructions there. You’ll need to switch to one of our old templates first, but then you’ll be able to use the Template Designer to pick a new one.


Tips from the Blogger Team
  • Get your links to match a background image quickly by using the Background panel’s “Main color theme” to adjust all of your blog’s colors at once. This works particularly well with Simple’s second design.
  • With a three-column footer, you can fit in several gadgets to interest your readers after they’re done reading your post. For inspiration, read Derek Powazek’s post, “Embrace your bottom!
  • If you’re using our new Pages feature, put the Page List gadget in the wide section at the top of your blog. We’ve added unique tab designs to all of the new templates.
  • Many of the patterns in the background image picker are semi-transparent, to let your blog’s background color show through. Look for the “transparency page curl” to see which patterns these are.
  • The Attribution gadget (added to the footer by all new templates) is there to give credit not just to the designer and artist of the background image, but to you as well. Edit its settings by clicking “Edit” on Layout > Page Elements to add your own authorship or copyright information.


Get Involved
  • Show off your new design on Twitter by tweeting your blog’s URL with the hashtag #newbloggertemplate. We’ll be looking for creative designs to feature in upcoming blog posts or as Blogs of Note.
  • We’re taking feature requests. Let us know what else you’d like to see with our Google Moderator page. (And don’t worry: uploading your own background image is already filed and at the top of our list!)
  • To report bugs or discuss the Template Designer in more detail, start a thread on our discussion forum. Include “Template Designer” in the subject so we’ll be sure to see it.
  • Do you design templates for Blogger? Join our template designer group for documentation and discussion on working with the new templates, as well as details on how to get your designs into the Template Designer.
Over the coming weeks and months we’ll be adding new features, templates, and images guided by the feedback we hear from you.


Miscellaneous Notes
  • The Template Designer is not supported on Internet Explorer 6, nor, for that matter, are the new templates. While we’ve made an effort to ensure that they’ll still be readable, the new designs are not going to look particularly attractive on IE6. We strongly encourage the very small number of bloggers and readers still using IE6 to upgrade to a more modern browser. For more information about browsers, visit Google’s What Browser? site.
  • The rounded corners and drop shadows used in several of the templates may not be visible in older versions of some browsers. Opera users will need to wait for Opera 10.5, currently in public pre-alpha release. IE7 and 8 users will not see these effects within the Template Designer, but will see most of them on the live blog itself.
  • From within the Template Designer you can only move gadgets around, you can’t add, delete, or change their settings. Those features are still on the Layout > Page Elements page.
  • Some gadgets, such as Poll, Reactions, or third-party Google Gadgets will not reflect color changes in the live preview but will after the template is applied. Others, such as Followers and AdSense, will not change colors automatically at all. It may be easiest to remove and re-add these gadgets to refresh their palettes, though you could also tweak the colors by hand by editing their settings.
  • Customizations to widget templates will be cleared when applying a new template to preserve the new layout. If you have made changes to your widget templates, save them first by going to Layout > Edit HTML and clicking “Download Full Template.” You’ll be able to copy them back in as needed after you apply your new template.

Improvements to Blogger In Draft's Text Editor

by Jiho Han, Software Engineer

We've made a couple of improvements to the Text Editor on Blogger in Draft

Add captions to your photos 

Now you can easily add captions to the images you include in your blog posts! To add a caption, simply click on the image you've inserted, and click Add caption.


Then you can write your caption just below the image. 


Expandable Edit Region

In addition to captions, we've recently added another new feature for you verbose bloggers out there. You can now expand the text area of the editor to give yourself more room as you type. To make the editor region larger, simply click the corner of the editor and drag it down.
The editor window will also grow automatically as you run out of space.

Faster Video Uploading

Your time is very important to us, and we are continuously working to make your experience on Blogger fast and easy. We know that it's no fun waiting for your videos to upload, so we've recently made speed improvements to make your videos upload faster.

Let us know what you think of these features in the comments below, and thanks for using Blogger!

Pages come to Blogger In Draft

by Sean McCullough, Software Engineer


Update (1/21 @ 8:54am PST): We've temporarily disabled creating & editing pages. You can still view the pages you've already created. We will re-enable ability to create and edit pages soon.


Update (1/21 @ 9:32pm PST): Pages are back on.


Pages have been a top requested feature, and they are now available on Blogger in Draft!

Blogger Pages lets you to publish static information on stand-alone pages linked from your blog. For example, you can use Pages to create an About This Blog page that discusses the evolution of your blog, or a Contact Me page that provides directions, a phone number, and a map to your location.


You create a page similar to how you write a blog post. From Blogger in Draft click the Posting | Edit Pages tab, then click New Page. (Note: you can create up to 10 pages.)


Once your page is published, you can link to it from the new Pages widget. The Pages widget lets you add links to your pages as tabs at the top of your blog, or as links in your blog's sidebar.


In the Pages widget, you can decide which pages will have links, and in what order they will appear. You can also choose whether or not you want links automatically created for pages when you create them by checking or unchecking the box to the left of Add new Pages by default.


Finally, for those of you that have custom templates, your custom template may not automatically support Pages as horizontal "tabs". If you are familiar with HTML, follow these instructions on how to add Pages to your custom template.

Let us know how it goes in the comments!